
Prerequisites:
API Platform (e.g., Postman)
Workspace admin rights
A valid token (with admin rights) – Create tokens
Users and teams configured in DataGalaxy
TABLE DES MATIÈRES
- Download the .json Files
- DataGalaxy API Connection Information
- Create a team
- Retrieve the ID of your teams created in DataGalaxy
- Attribute triggering transitions
- Retrieve the ID of the workflows created in DataGalaxy
- Create a workflow
- Edit a Workflow
- Delete a workflow
Download the .json Files
At the bottom of the page, you will find the .json files to download to create or modify workflows.
Environment .json: This file contains all the variables used in the collection's requests.
Collection .json: This file contains all the requests required to create workflows for campaigns.
DataGalaxy API Connection Information
In your development tool (in this example, we are using Postman), fill in the variables used by your requests. These variables contain the connection information for your DataGalaxy workspace.
The most important variables are:
| accessToken | The token you generated from your DataGalaxy account. |
| baseUrl | The access URL to the DataGalaxy API. You can find this URL in your environment under Profile > DataGalaxy API. |
| spaceId | Your DataGalaxy workspace ID, which you can find in your URL: https://client.app.datagalaxy.com/space/SPACEID/versionID/ |
In Postman, you have two different ways to set variables:
- From the environment: Enter the same value in "Initial value" and "Current value".
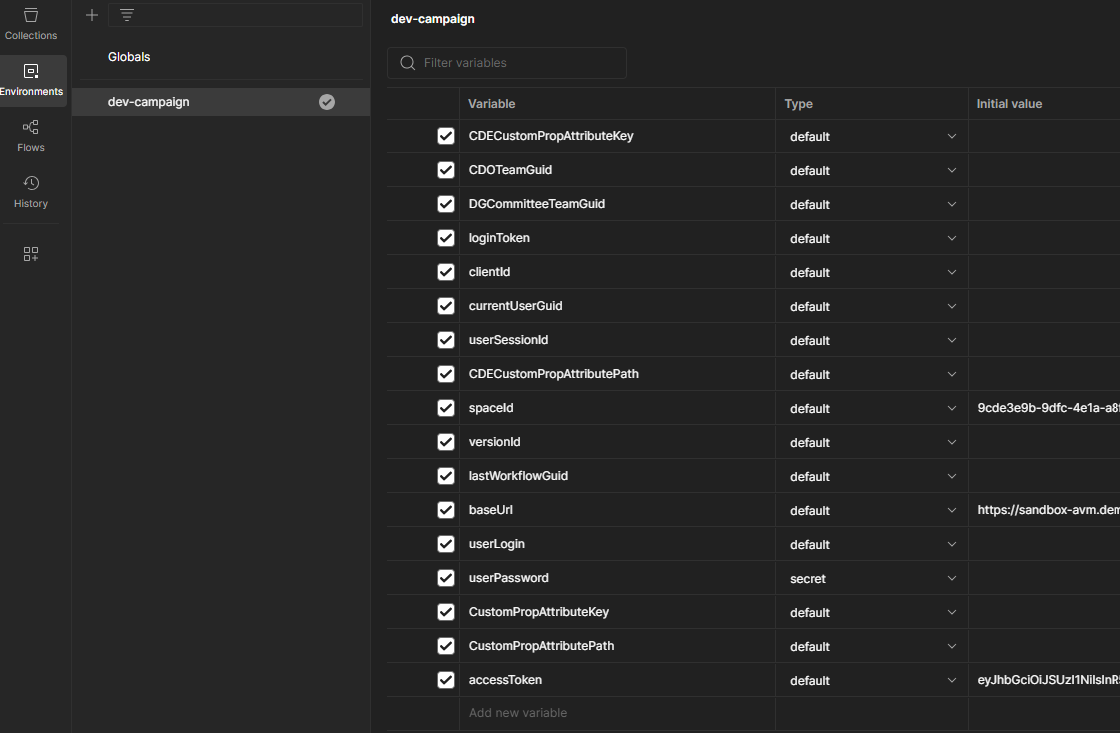
- From the collection tab, click the “Variables” button at the top right of your screen:
Create a team
- To create a team directly from the API, use the call: POST /teams
Use the request body below:
{
    "name": "Dream Team",
    "description": "This team is composed of the best of the best.",
    "email": "contact@dreamteam.com",
    "access": "limited",
    "owners": [
        "john.smith@datagalaxy.com"
    ],
    "members": [
        {
            "email": "john.smith@email.com",
            "role": "member"
        }
    ]
}| Access | There are three types of access.
|
| Role | There are two types of roles.
|
Retrieve the ID of your teams created in DataGalaxy
- Use the call: GET {{baseUrl}}/Teams
To retrieve the ID of the teams created in DataGalaxy, use the request below (request body) from your imported Workflow collection:
{
  "total": 1,
  "results": [
    {
      "name": "",
      "description": "",
      "email": "",
      "access": "",
      "id": "",
      "iconHash": "",
      "owners": [
        ""
      ],
      "membersCount": 1,
      "members": [
        {
          "email": "",
          "role": ""
        }
      ]
    }
  ]
}
In the case of the “CDO Office” team created in my DataGalaxy workspace, I get the following result after sending the request:
{
    "results": [
        {
            "name": "CDO Office",
            "description": "CDO Data Office team",
            "email": "",
            "access": "private",
            "id": "d1fdd2fa-adf5-452d-b13c-88a4eee855d1:78cca48f-9f3b-4c8c-aaa8-59430120c904",
            "iconHash": null,
            "owners": [
                "antoine.vadimon+sdbx@datagalaxy.com"
            ],
            "membersCount": 1
        },
    ],
    "total": 1
}
We retrieve several pieces of information (name, description, owners, access types, ID, etc.) The part of the ID that interests us for using the "TeamGuid" workflow variable is the second part, here: 78cca48f-9f3b-4c8c-aaa8-59430120c904
Attribute triggering transitions
To manage the workflow, we will need a common attribute: an object attribute that can be controlled in order to trigger transitions. You can use an existing "Value list" type attribute, such as "Entity status". In this example, we will create our own custom "Value list" attribute, called "Workflow Value List".
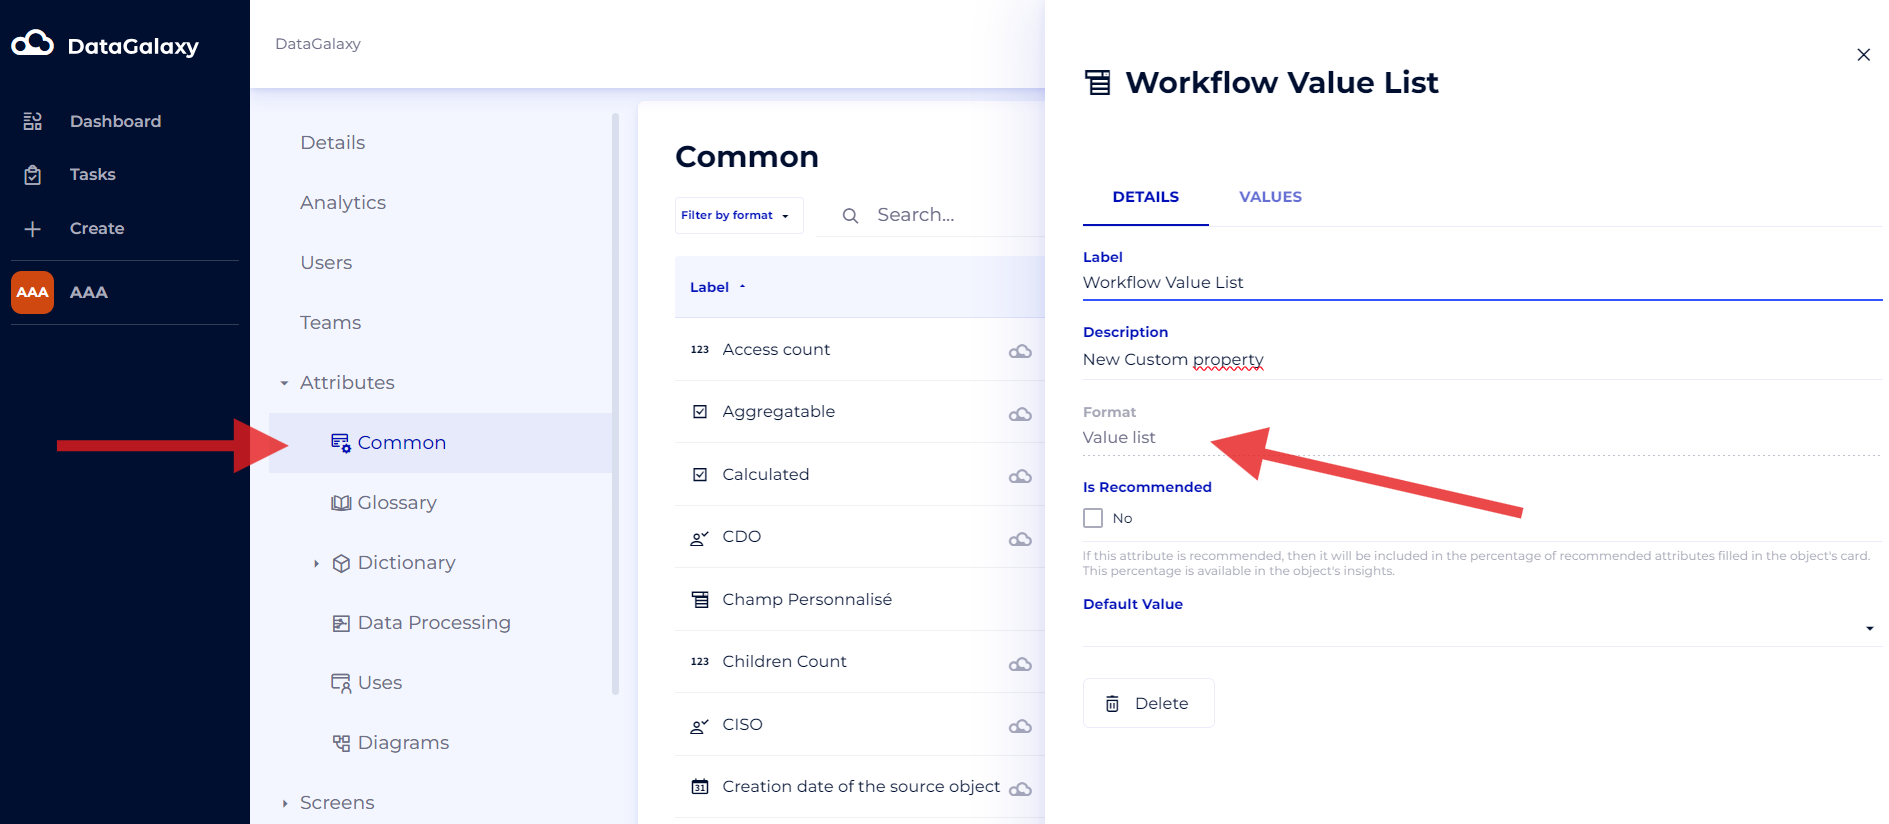
Note: The attribute must be of type Value List and a common attribute.
To create the workflow, we need the attribute path and the technical values of its values.
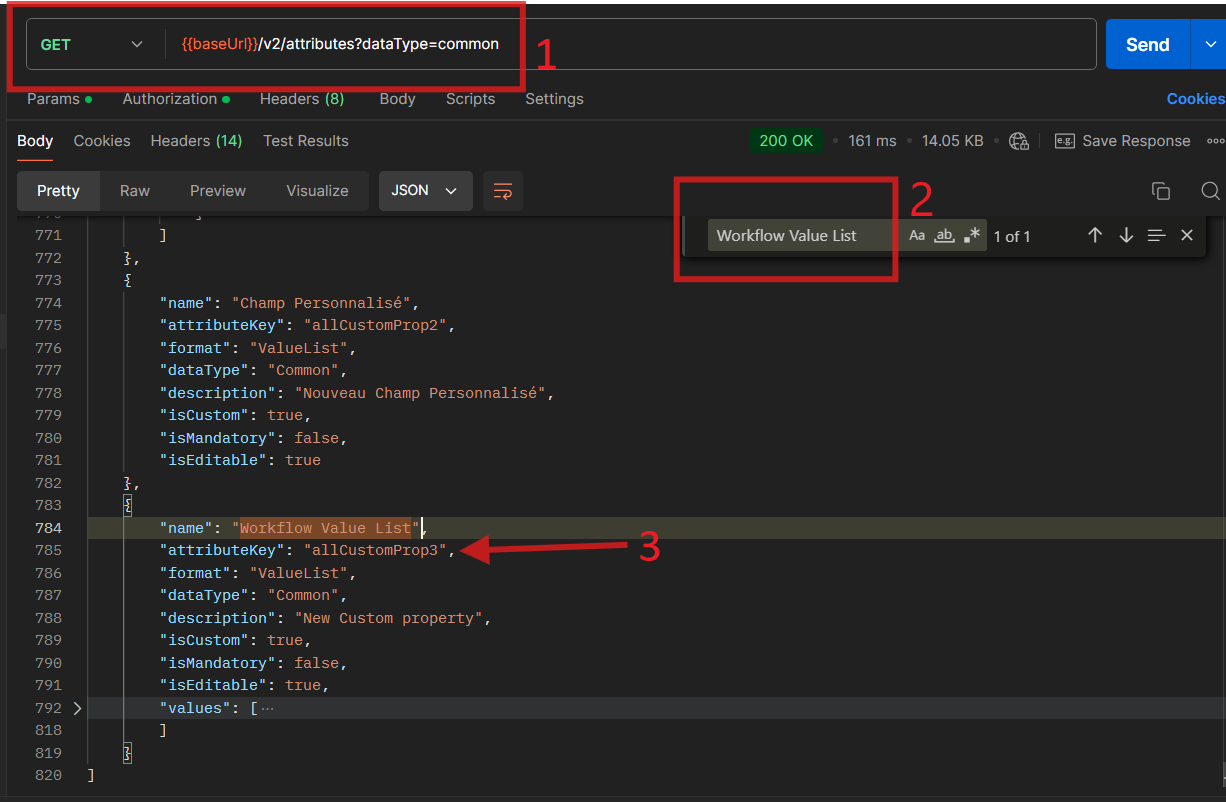
- To retrieve all common attributes, use the following API call: GET {{baseUrl}}/v2/attributes?dataType=common.
- The API call will return all common attributes. Search for your attribute by its name.
- Find the attribute key to build the attribute path. For all custom common attributes, you must add a "." as a prefix to the attribute key. In this specific case, the attribute path will be .allCustomProp3.
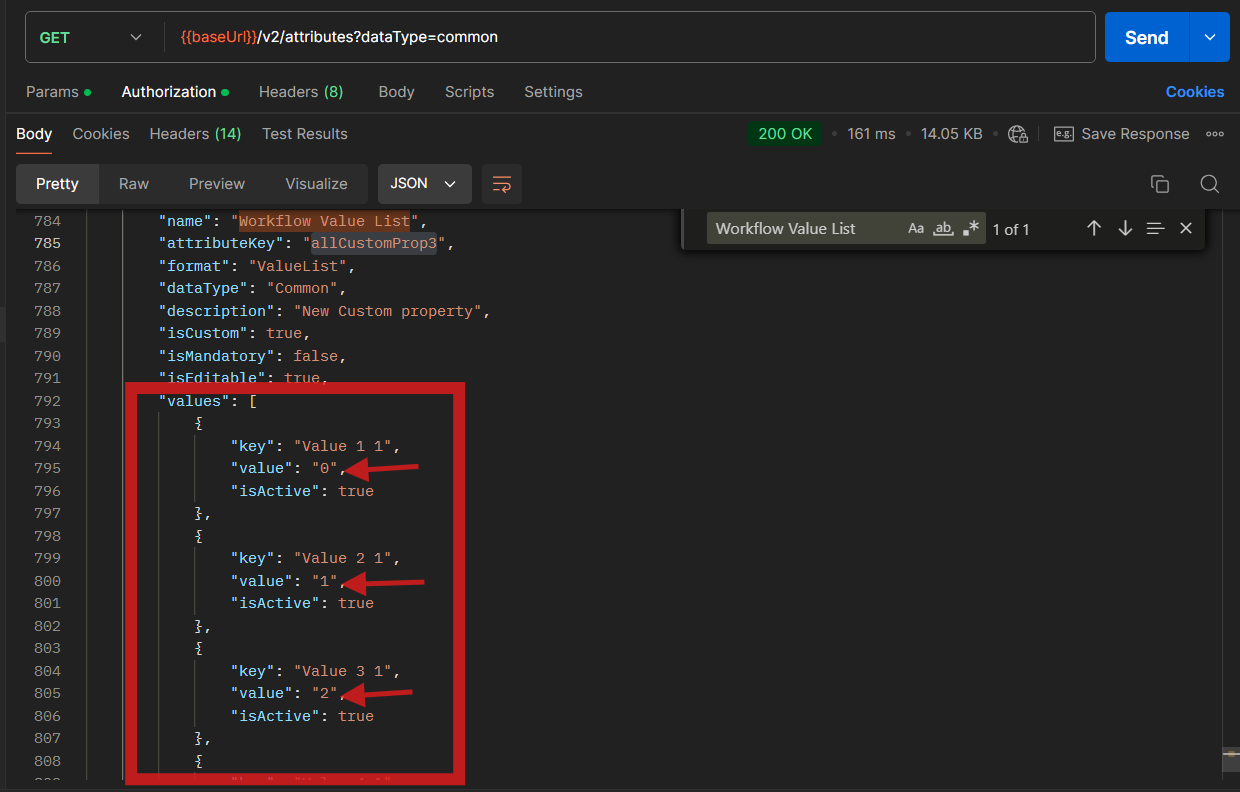
All attribute values are loaded at the same time as the attribute information. To create the workflow, we use the numeric technical value.
Retrieve the ID of the workflows created in DataGalaxy
- Use the call: GET {{baseUrl}}/workflow/space/{{spaceId}}/workflows
Once the request is sent, you get the following result:
[
    {
        "Guid": "ab6c4501-c9e5-4092-b47f-63ed89593be3",
        "Name": "DataGalaxy objects lifecycle workflow"
    },
    {
        "Guid": "44a1d813-731f-4110-bcef-2e4b61051da8",
        "Name": "Data Element Certification Campaign"
    }
]
For each campaign workflow you have in DataGalaxy, you retrieve the name and ID.
Create a workflow
- To create a workflow, use the call: POST {{baseUrl}}/Workflow
Below is an example of creating a workflow: In this example, the CDO Office team wants to launch a certification campaign for the objects present in DataGalaxy.
- The CDO Office asks the Data Steward to update the various information related to the objects included in the campaign → object status: "proposed"
- The Data Steward reviews the objects and makes the necessary changes → object status: "in review"
- The Data Steward informs the Data Owner once the object has been reviewed → object status: "in validation"
- The Data Owner either validates that the object's information is correct [1], or requests changes from the Data Steward [2] → object status: "validated" [1] or "in review" [2]
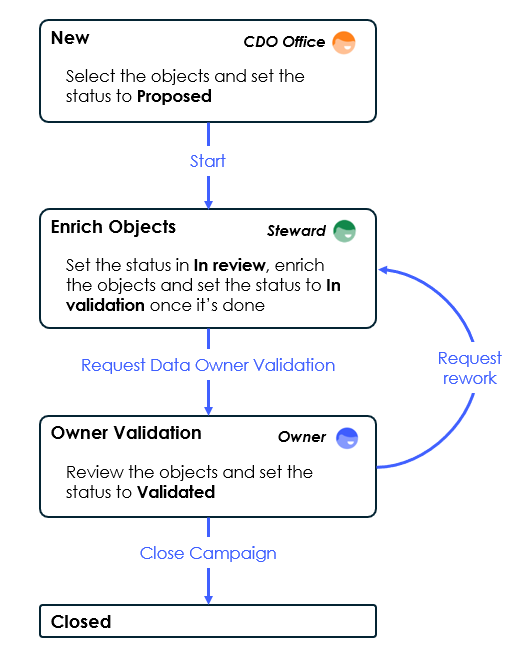
The associated request body will be:
{
    "SpaceGuid": "{{spaceId}}",
    "Name": "Data Element Certification Campaign",
    "AttributePath": "EntityStatus",
    "Phases": [{
            "Name": "New",
            "Description": "Configure your campaign and add objects. Expect objects to be in a Proposed state in order to start Data Element certification campaign",
            "PhaseType": "Initial",
            "Transitions": [{
                    "TransitionName": "Start",
                    "TargetPhaseName": "Enrich objects",
                    "Description": "Start campaign and request Data Stewards to enrich objects. Expect objects to be in a Proposed state in order to start Data Element certification campaign",
                    "Direction": "Forward",
                    "ExpectedAttributeValues": [0]
                }
            ],
            "Assignees": [{
                    "TeamGuid": "78cca48f-9f3b-4c8c-aaa8-59430120c904"
                }
            ]
        }, {
            "Name" : "Enrich objects",
            "Description": "Data stewards must add/update required information and update Data Element status accordindly",
            "PhaseType": "Regular",
            "Transitions": [{
                    "TransitionName": "Request Data Owner validation",
                    "TargetPhaseName": "Data Owner validation",
                    "Description": "Objects should be at least enriched, and because rework can be requested later on for some objects, they can be in any more mature state",
                    "Direction": "Forward",
                    "ExpectedAttributeValues": [1, 2]
                }
            ],
            "Assignees": [{
                    "GovernanceRole": "DataStewards"
                }
            ]
        }, {
            "Name": "Data Owner validation",
            "Description": "DataOwner review ongoing, objects Data Element status can be promoted to Validated when appropriate. If acceptance criterias are not met, a new steward review can be requested",
            "PhaseType": "Regular",
            "Transitions": [{
                    "TransitionName": "Close Campaign",
                    "TargetPhaseName": "Closed",
                    "Description": "All objects Data Element status should be Certified in order to close the campaign",
                    "Direction": "Forward",
                    "ExpectedAttributeValues": [3]
                }, {
                    "TransitionName": "Request rework",
                    "TargetPhaseName": "Enrich objects",
                    "Description": "Some objects couldn't be validated at this stage and require further work",
                    "Direction": "Backward",
                    "ExpectedAttributeValues": [0, 1, 2, 3]
                }
            ],
            "Assignees": [{
                    "GovernanceRole": "DataOwners"
                }
            ]
        },
        {
            "Name": "Closed",
            "Description": "Campaign is closed",
            "PhaseType": "Final",
            "Transitions": [],
            "Assignees": []
        }
    ]
}
The request above describes all the phases of the workflow. For each phase, we have the following information:
| Name | Phase name |
| Description | Phase description |
| PhaseType | Phase type, there are 3 types:
|
| TransitionName | Name of the transition between 2 phases |
| TargetPhaseName | Target phase name |
| Description (transition) | Transition description |
| Direction | Transition direction, there are two types of transitions:
|
| ExpectedAttributeValue | The value corresponds to the campaign status:
|
| Assignees | Assigned role or team:
|
Once your request is submitted, you can find your workflow when creating a campaign in DataGalaxy.
Edit a Workflow
- To edit a workflow, use the call: PUT {{baseUrl}}/Workflow/Workflow_ID
- Enter the ID of the workflow you want to modify in the request command.
- Add the code in the request body according to your needs.
Delete a workflow
- To delete a workflow: DEL {{baseUrl}}/Workflow/Workflow_ID
To delete a workflow, simply enter the ID of the target workflow in the request call.
Warning: This action is permanent!
Below are the .json files to download: