
User access rights management based on access control attributes has not yet been deployed to all clients. If this feature is not yet be visible within your environment, please contact your Account Manager to schedule its activation or to obtain information regarding its deployment date for your environment .
This article explains an enriched, more advanced version of the user access rights management system.
Before reading further, please make sure you've read the base version of access rights management first : Manage users access rights.
This new version allows to define access rules based not only on modules and sources, but also on tags, multi-value lists, hierarchies, and object status, these are called access control attributes.
In practice, this allows to give access to a much more precise scope. For example, administrator can allow all users to view all objects, while only allowing a specific team edit a set of objects identified by a tag. This feature is available for workspace administrators.
Access Rights Management Process
Access rights are managed via rules. Setting up a rule takes two steps.
Step one: configure the access control attributes that will be used to define access.
Step two: create an access rule by filling in these fields :
- Rule name
- Users and/or teams
- Permission level: Can view or Can edit
- Modules and/or sources
- Access control attributes
Note: control attributes aren't mandatory, but they're very useful when you want to give access to only part of a module instead of the whole module. For example, you could create an edit rule for the CRM team that only covers Glossary objects tagged CRM.
Configuring access control attributes
For each workspace, the admin can select, under the Tags section, up to 3 attributes of type tag, multi-value list, or hierarchy (system or custom), plus the status. This selection is shared by all admins on the workspace, so if several admins log in, they'll all see the same attributes selected.
As a workspace administrator, you need to configure these access control attributes via the dedicated button next to the "+" button on the Access screen.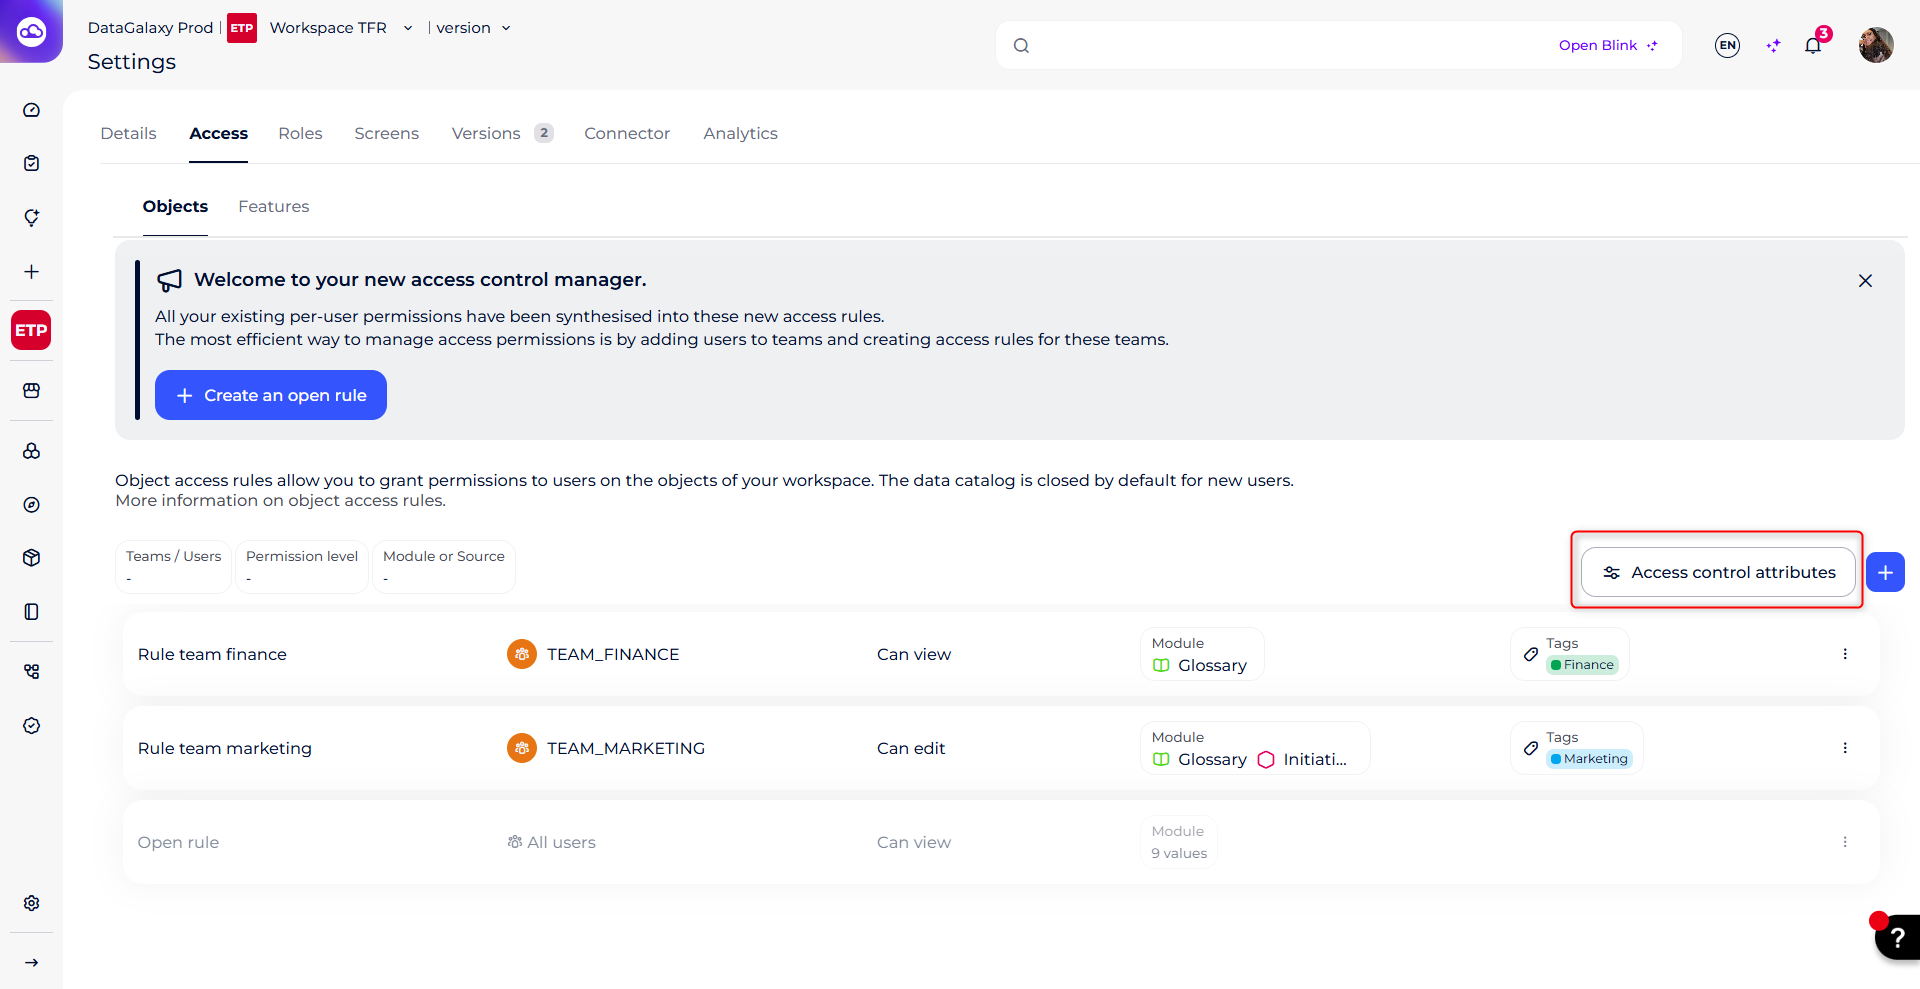 This button lists all the attributes that can be used as access control attributes, from the three types mentioned above. This needs to be done first, before creating any rules, the attributes only show up in the rule creation modal once they've been selected here.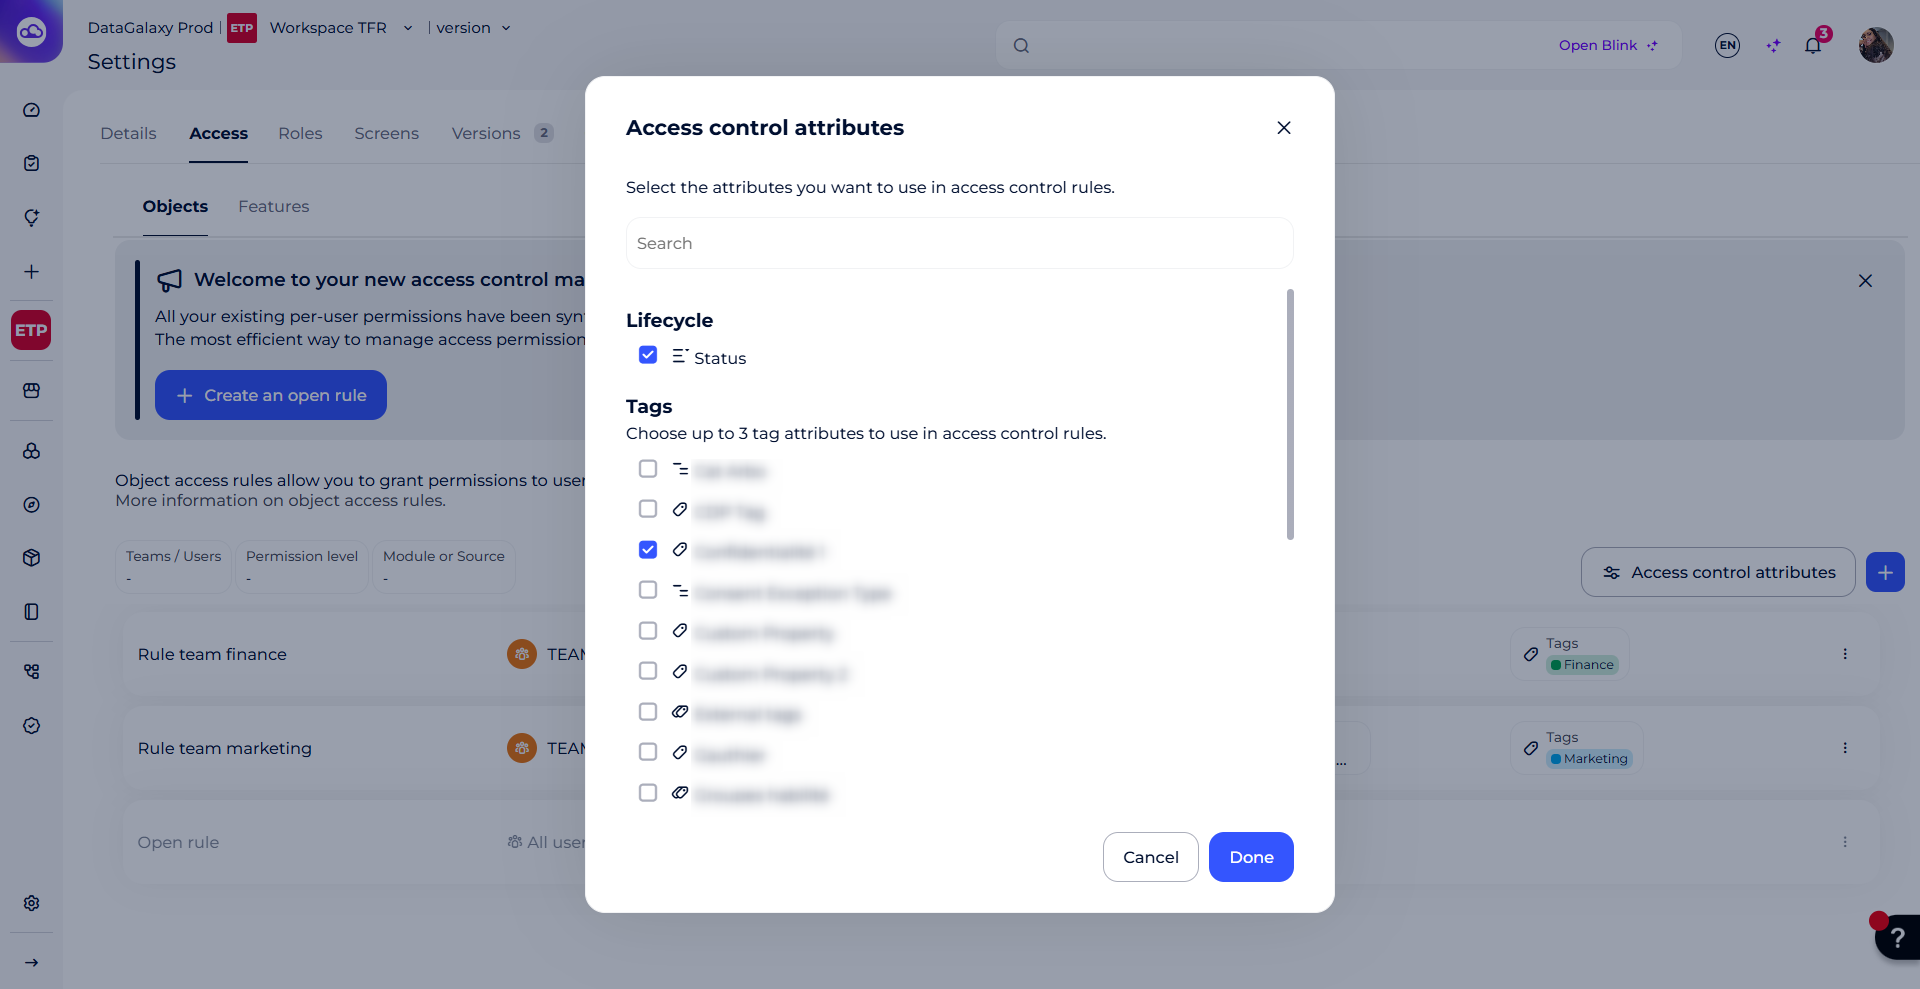
A few guardrails protect this setup:
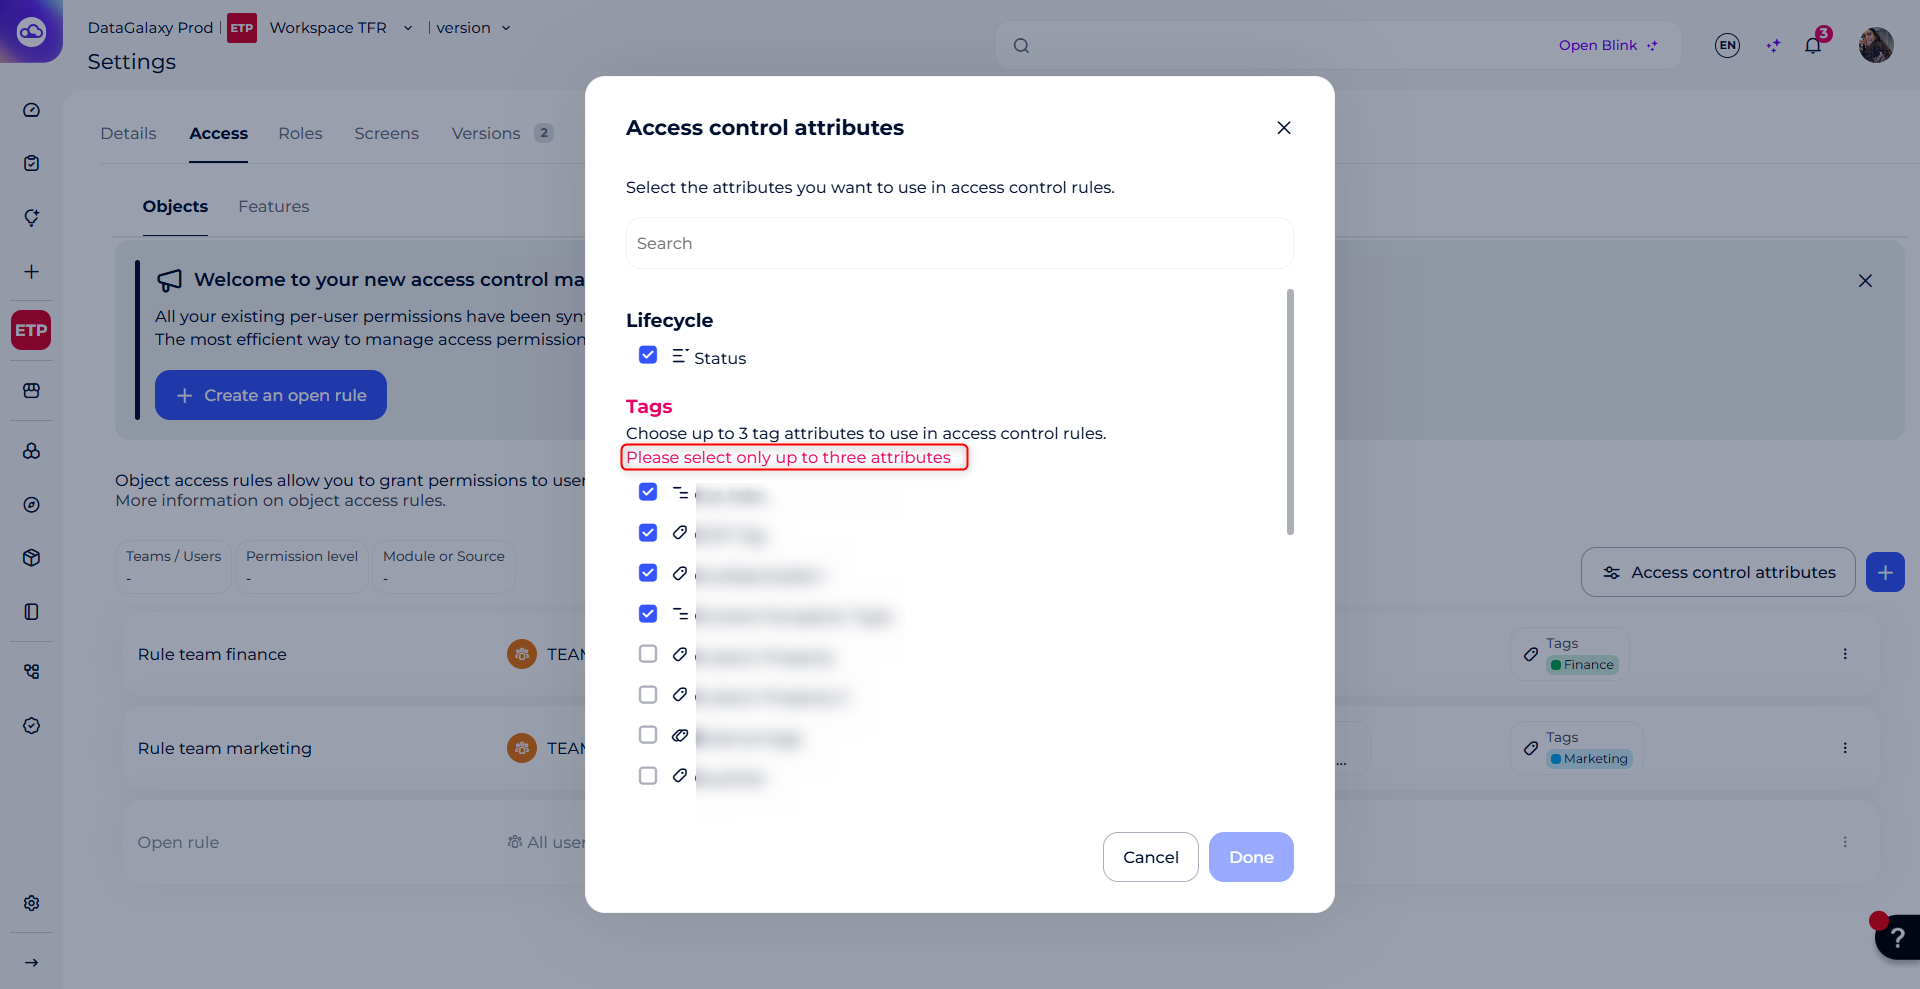
- You can't select more than 3 attributes under Tags. Trying to add a fourth one is blocked.
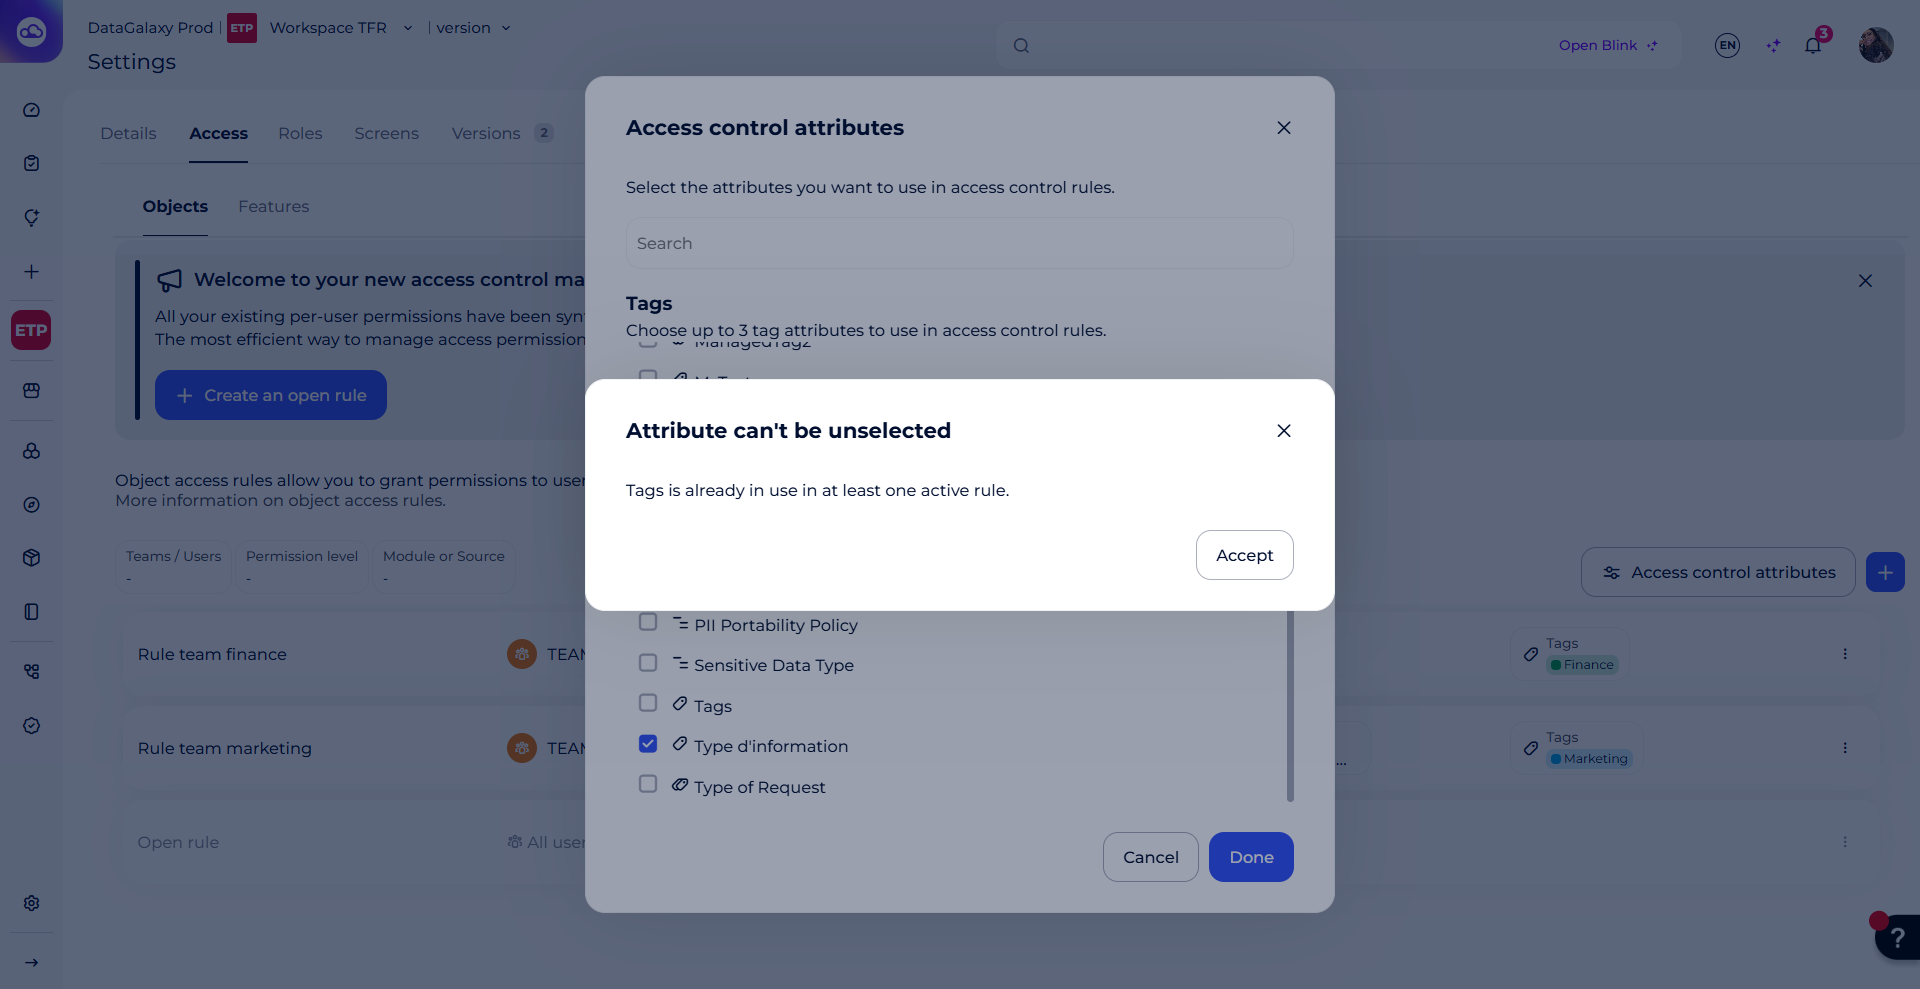
- You can't remove an attribute that's already used in a rule. This is also blocked.
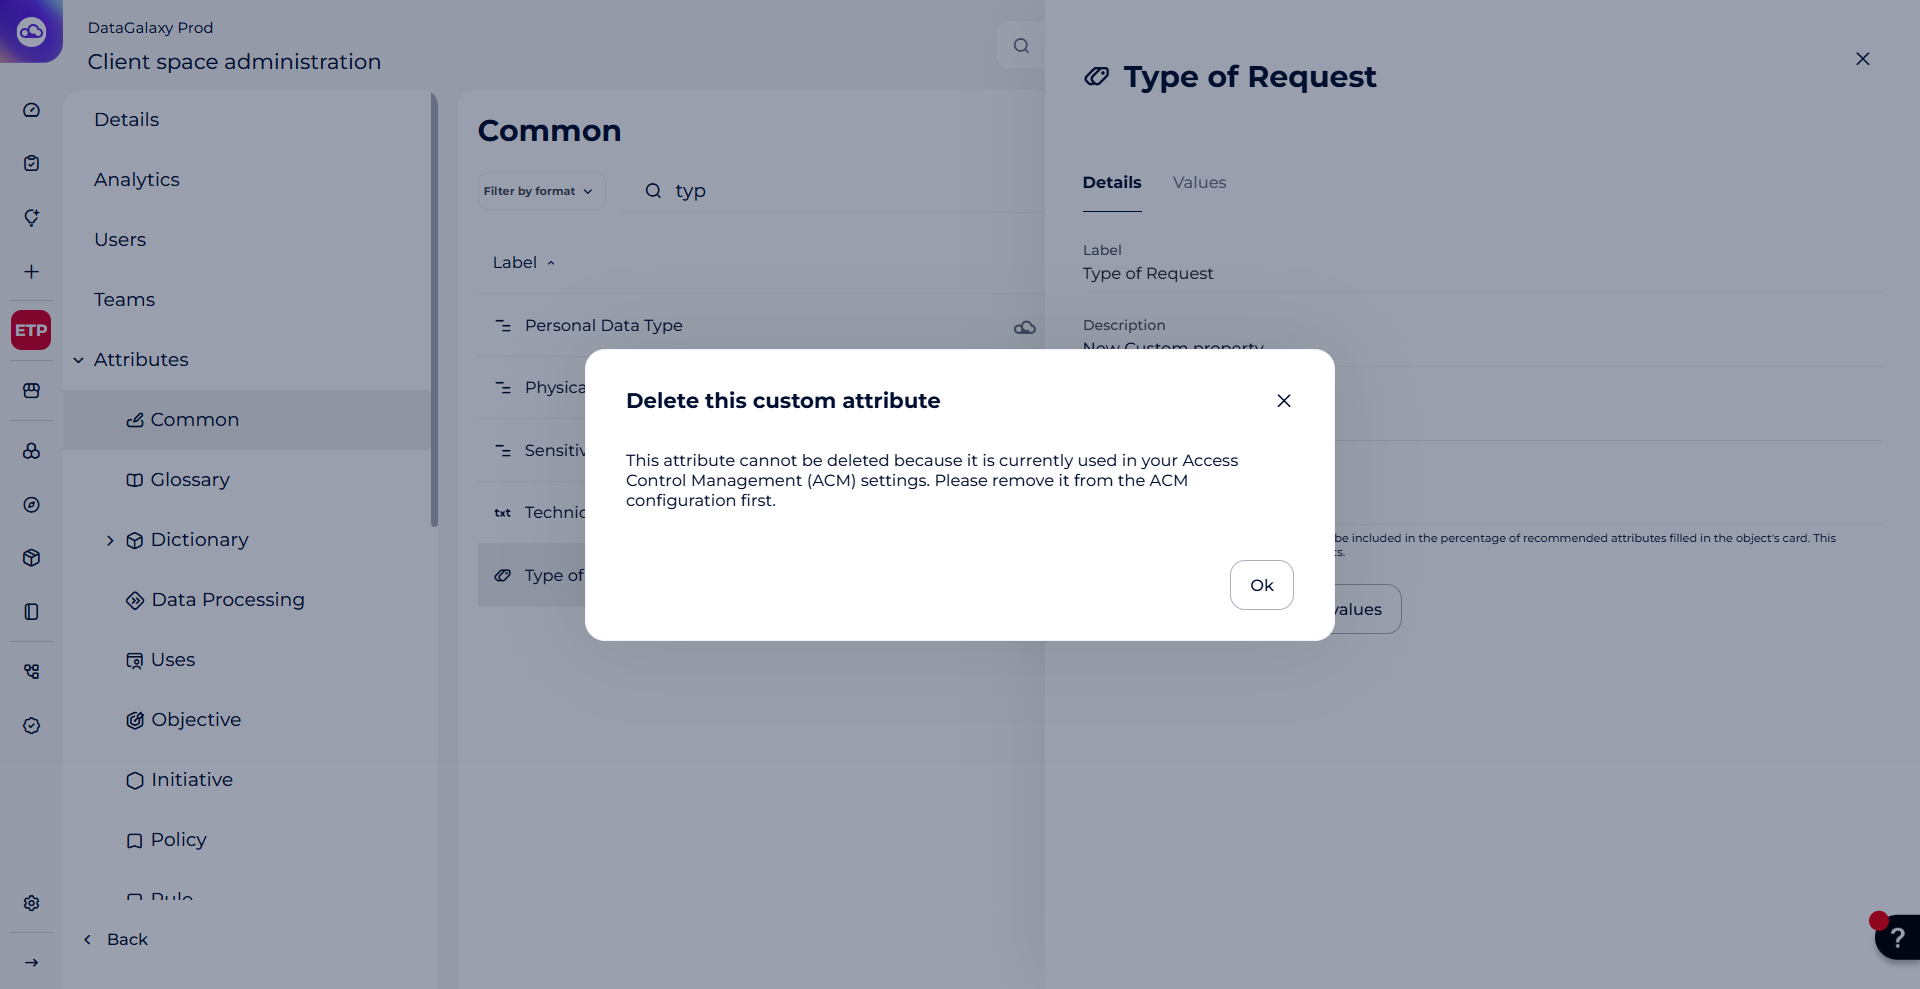
- An admin can't permanently delete an attribute (from the Client Space admin) if it's used in a rule.
Creating an access Rrle based on access control attributes
To create a rule that gives access to a precise scope instead of an entire module or source, just add filters on the access control attributes (the ones you selected in the previous step) to your base rule.
A new section has been added to the rule creation modal, alongside the existing fields (Rule name, Users/teams, Permission level, Modules/sources): the Access Control Attributes section.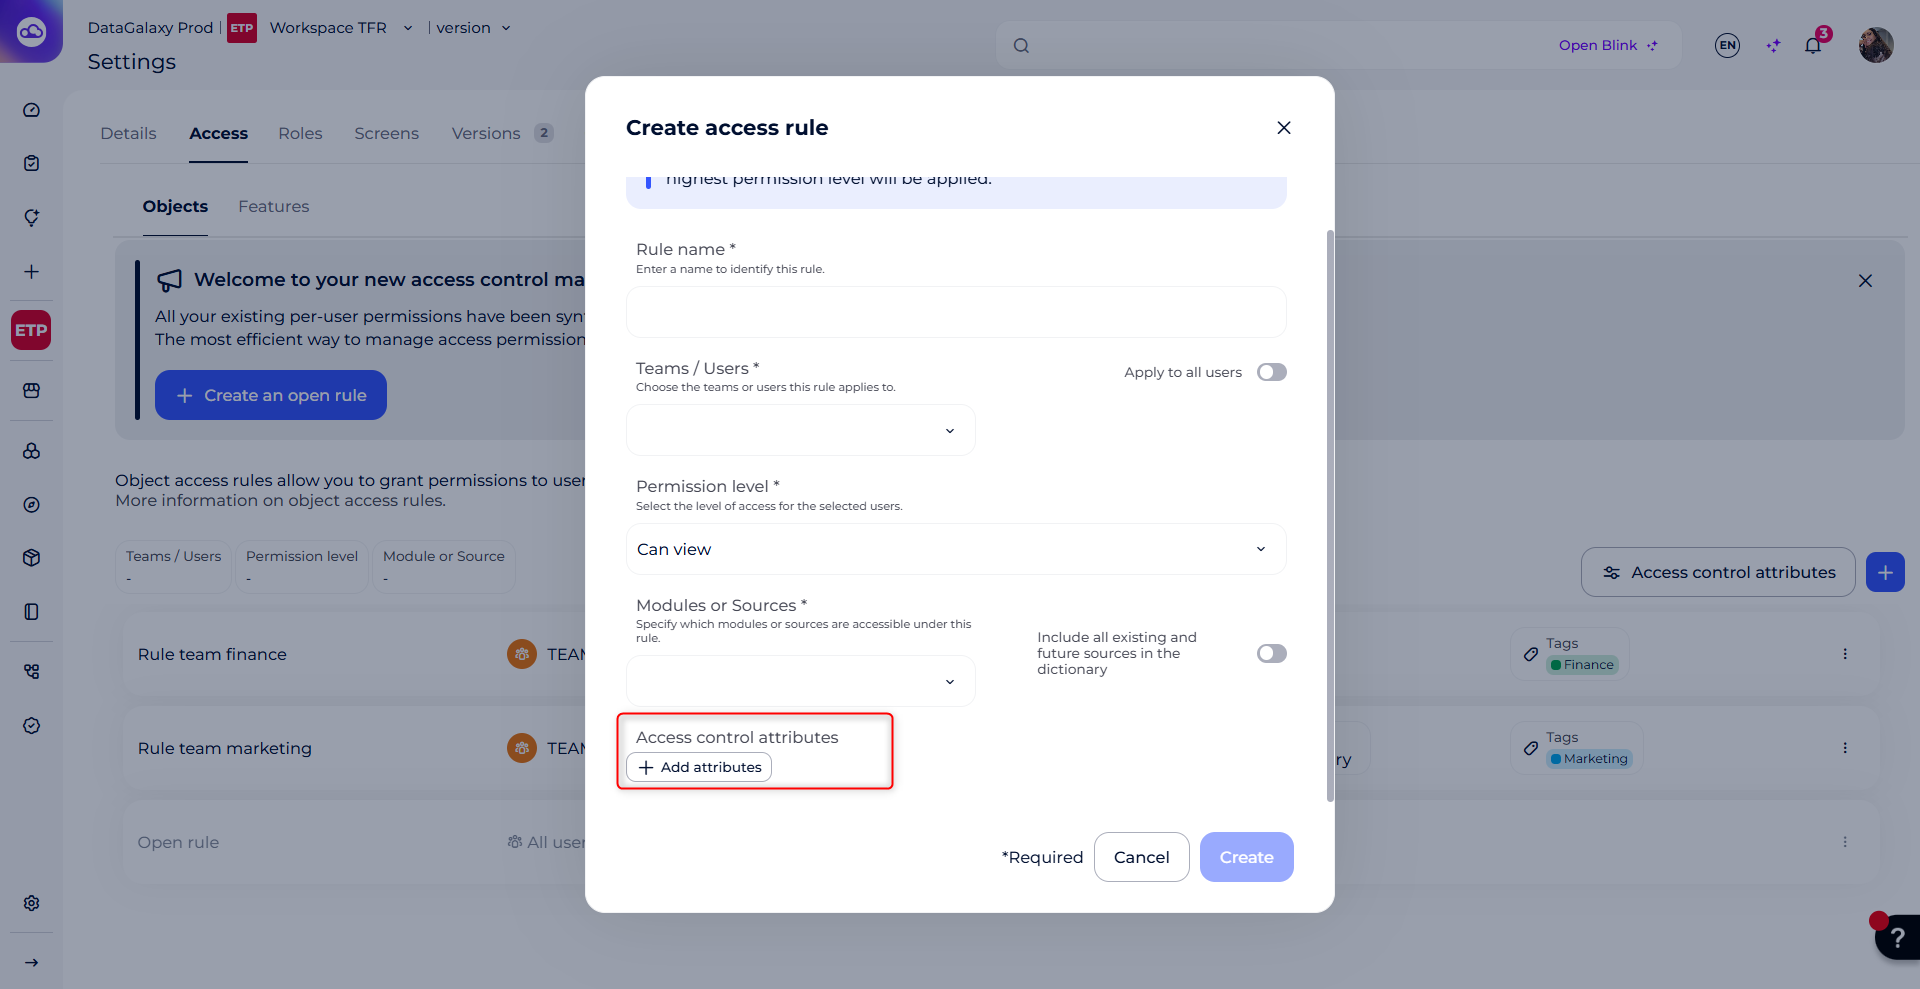
Here, an "Add attributes" button allows to pick the attribute you want to filter on to narrow down the rule's scope. Clicking it opens a dropdown with the attributes you selected earlier.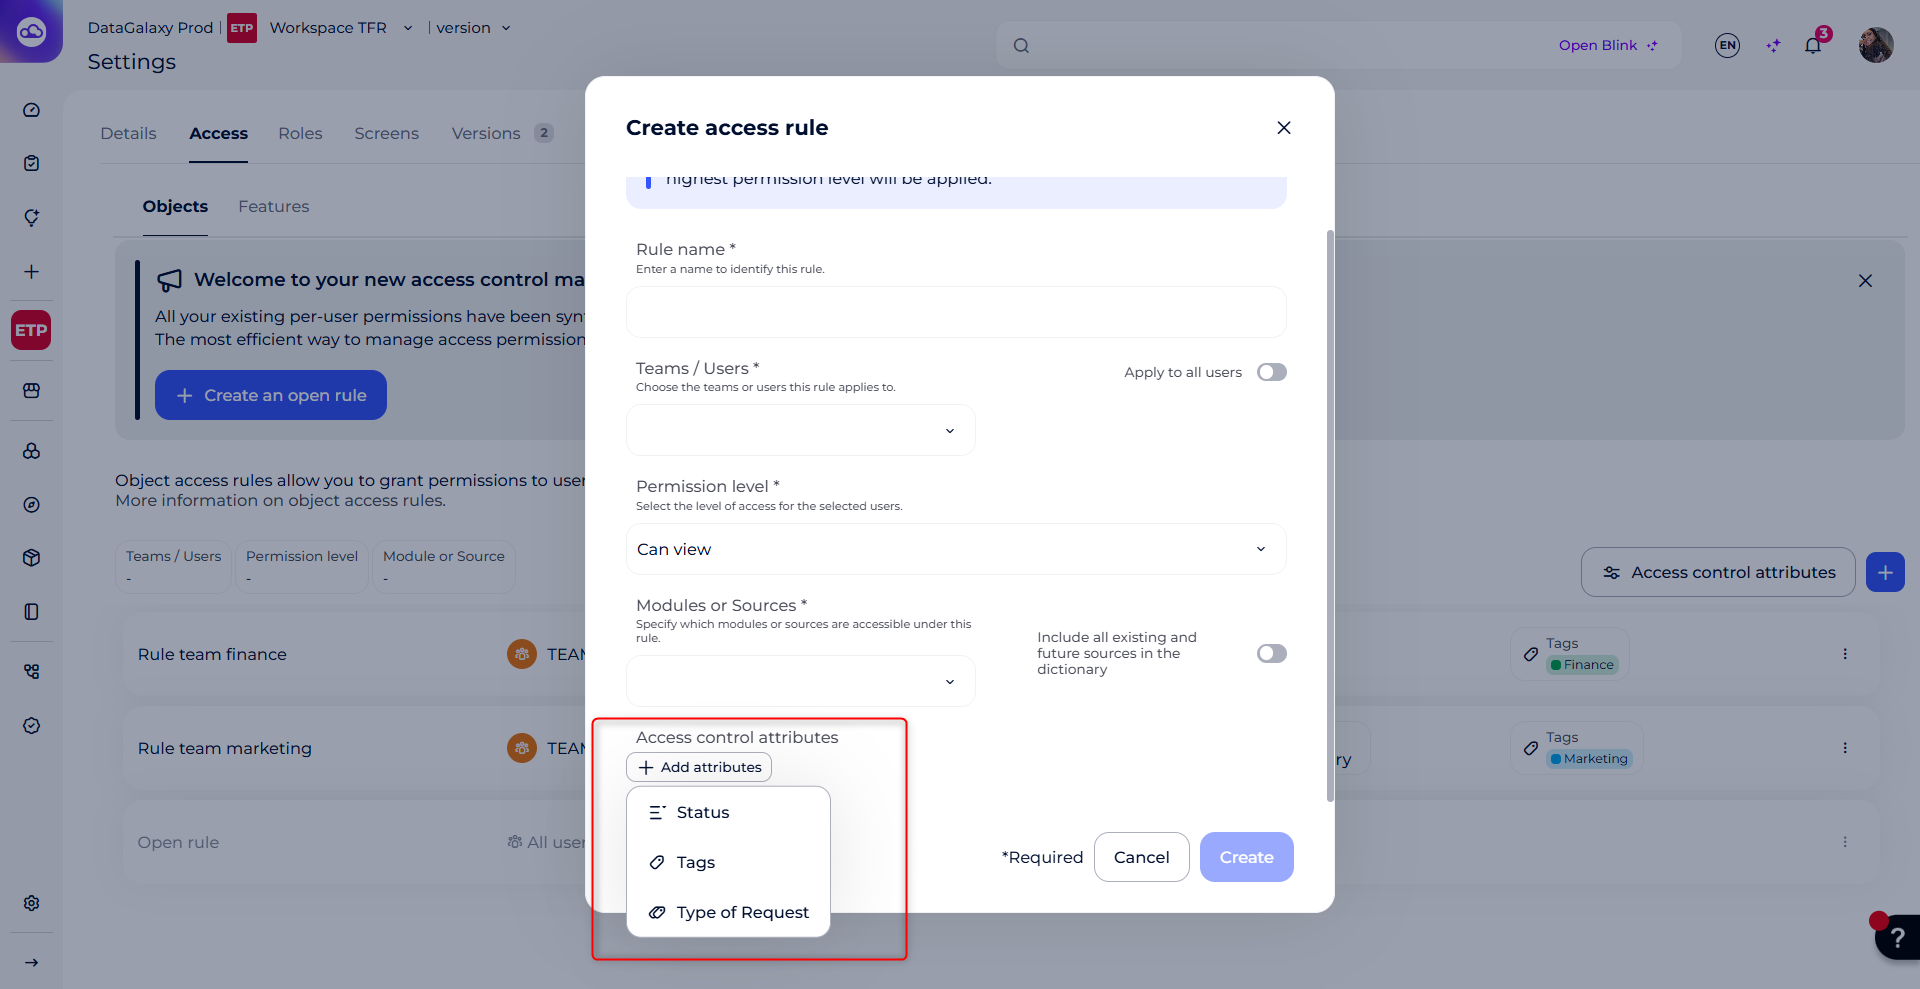
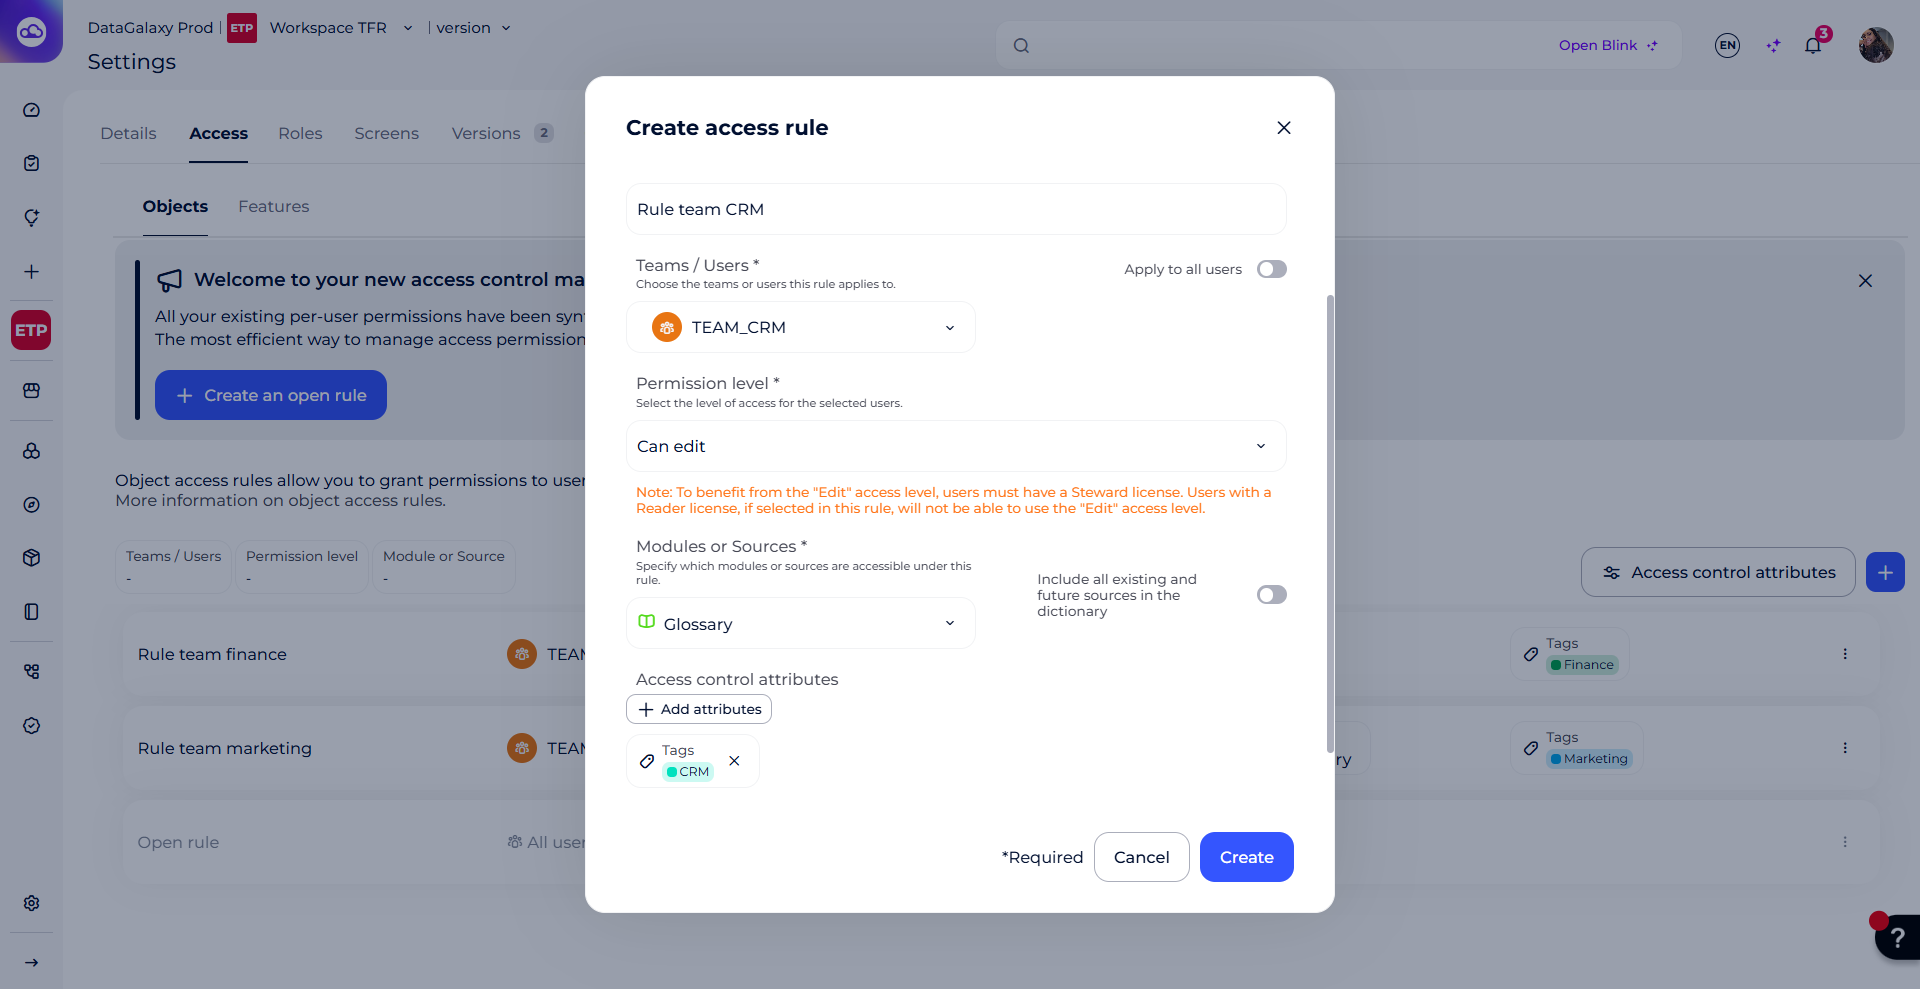
Here's an example: You need to create a rule that gives edit rights to your CRM team (already created in the Client Space admin), but only for Glossary objects tagged CRM.
To do this:
- Enter the rule name
- Pick the CRM team in the Teams/Users field
- Set the permission level to "Edit"
- Pick the Glossary module
- In the Access Control Attributes section, select the tags attribute, then the CRM value
- Click "Create"
Once created, the rule shows up on the Access screen with its name, the users it applies to, and the module and filters attached to it (in our example, the CRM tag).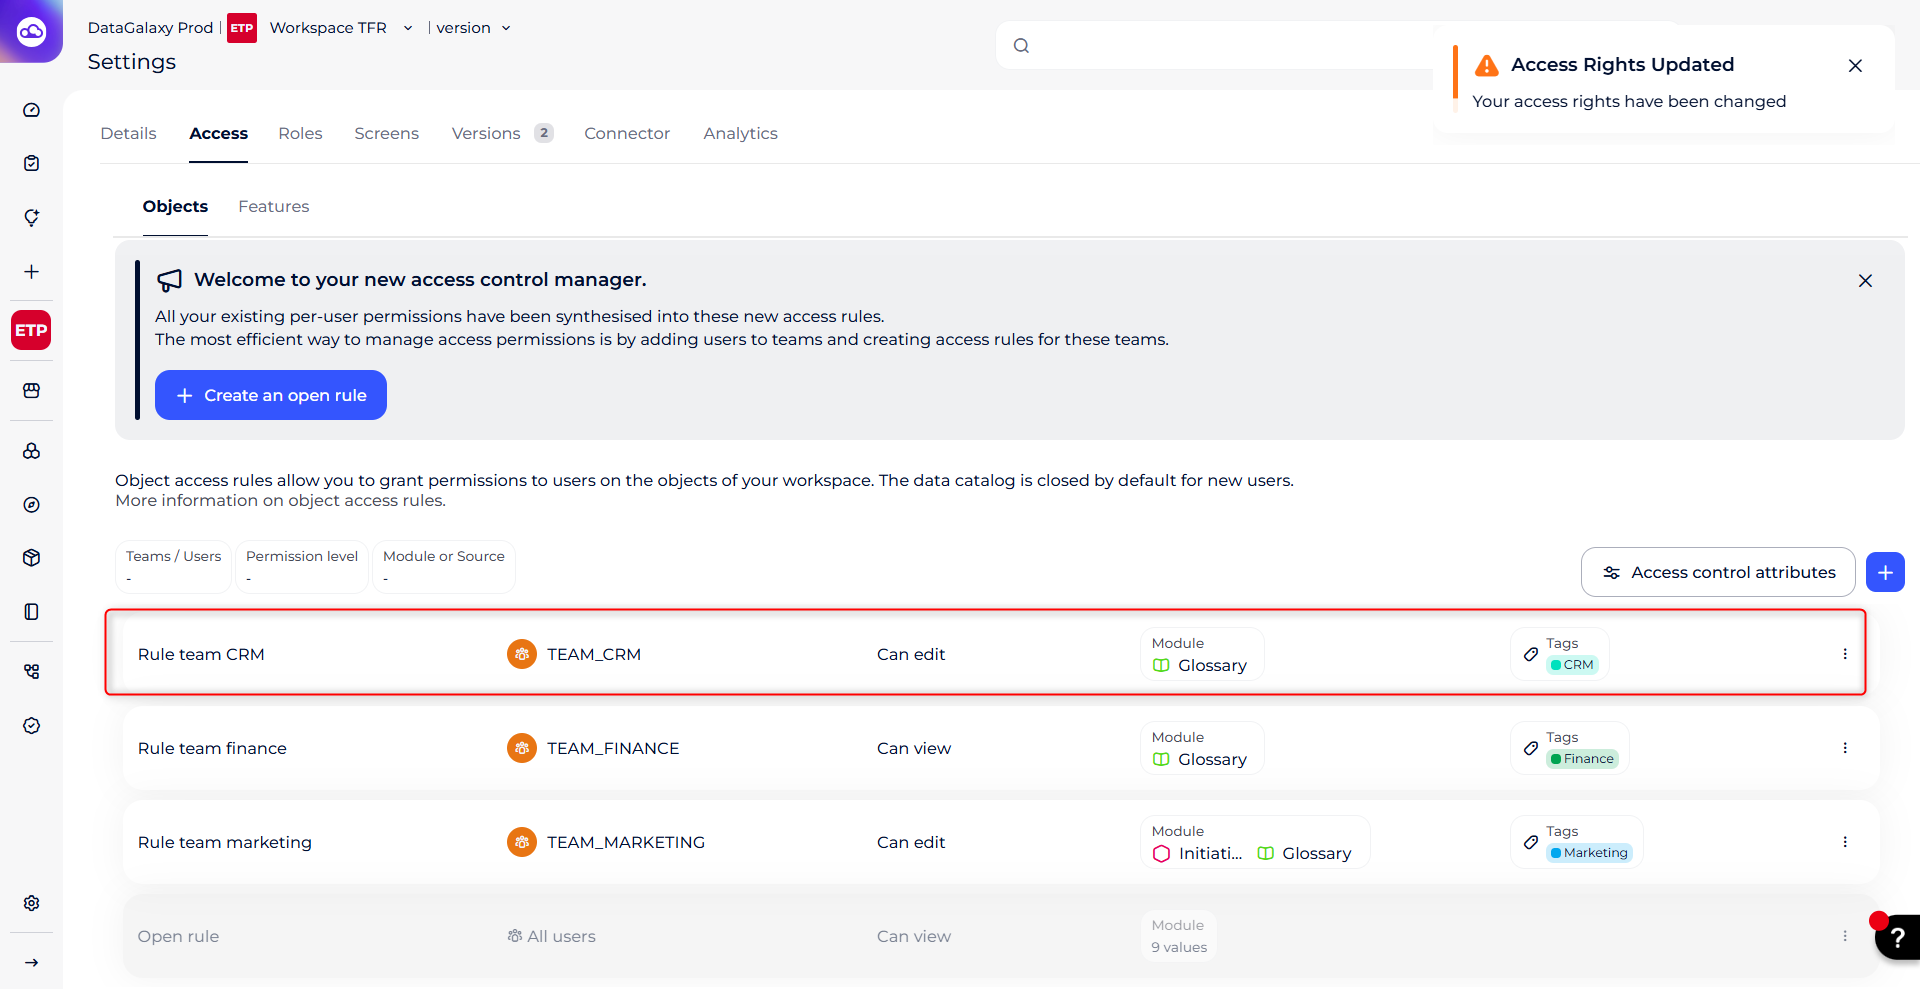
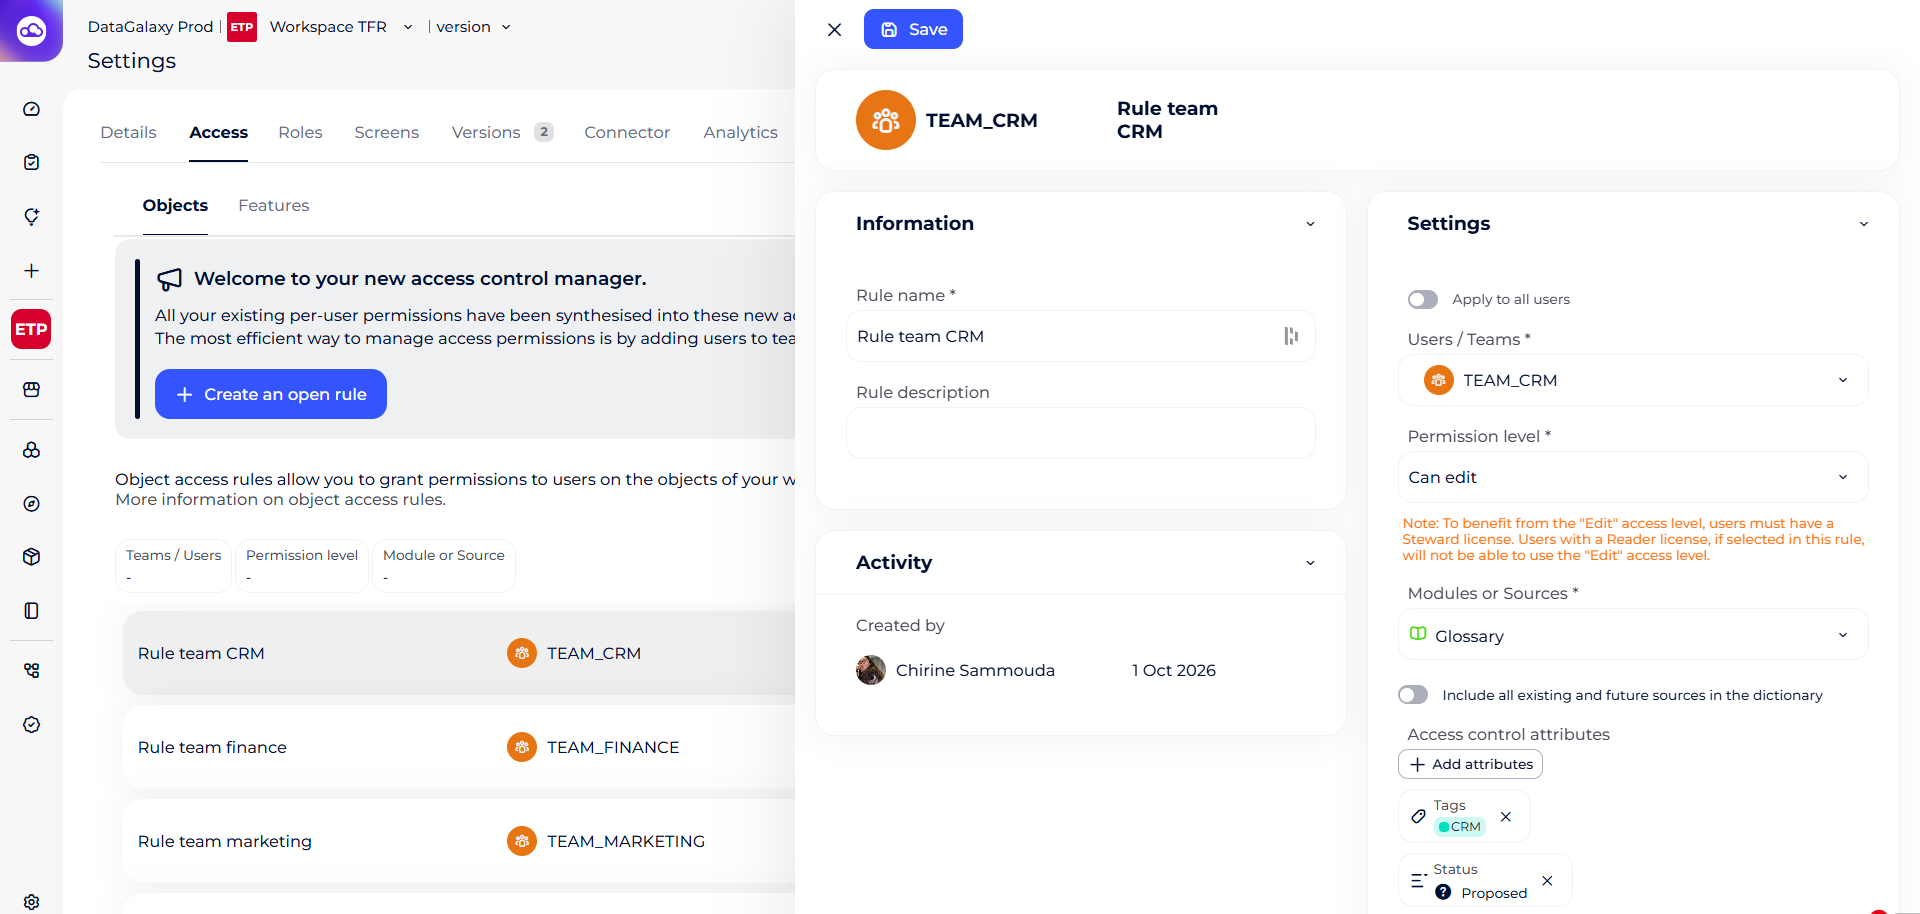
Now for example, you want your CRM team to only edit Glossary objects tagged CRM AND with the status "Proposed". Here's how to do it:
- Click the rule to open its preview
- Click the access control attributes button
- Select the Status attribute (already chosen during setup)
- Pick the "Proposed" value
- Click Save at the top of the preview
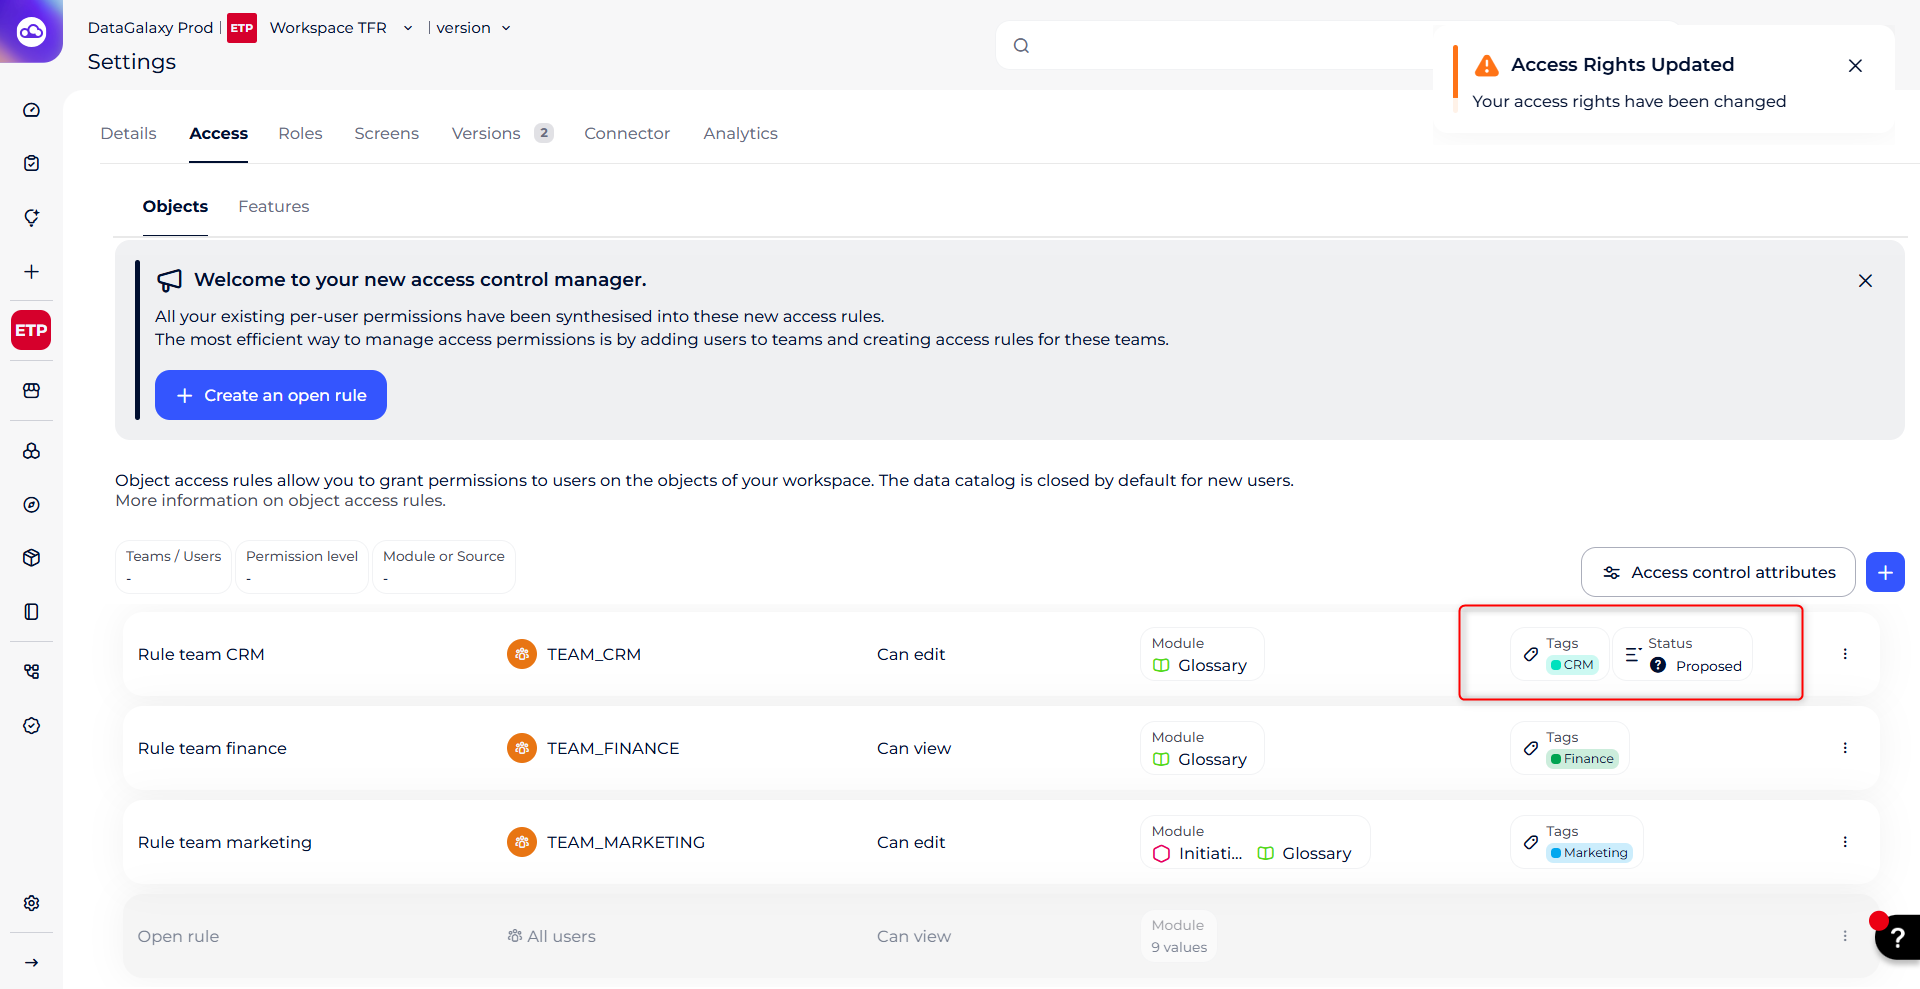
The rule is now updated.
Good to know:
An attribute created under "Common" (in the Client Space admin) is available for all modules. An attribute created for a specific module only works in rules for that module.
If you apply an attribute that isn't linked to the module chosen in that same rule, a warning message shows up when you create the rule.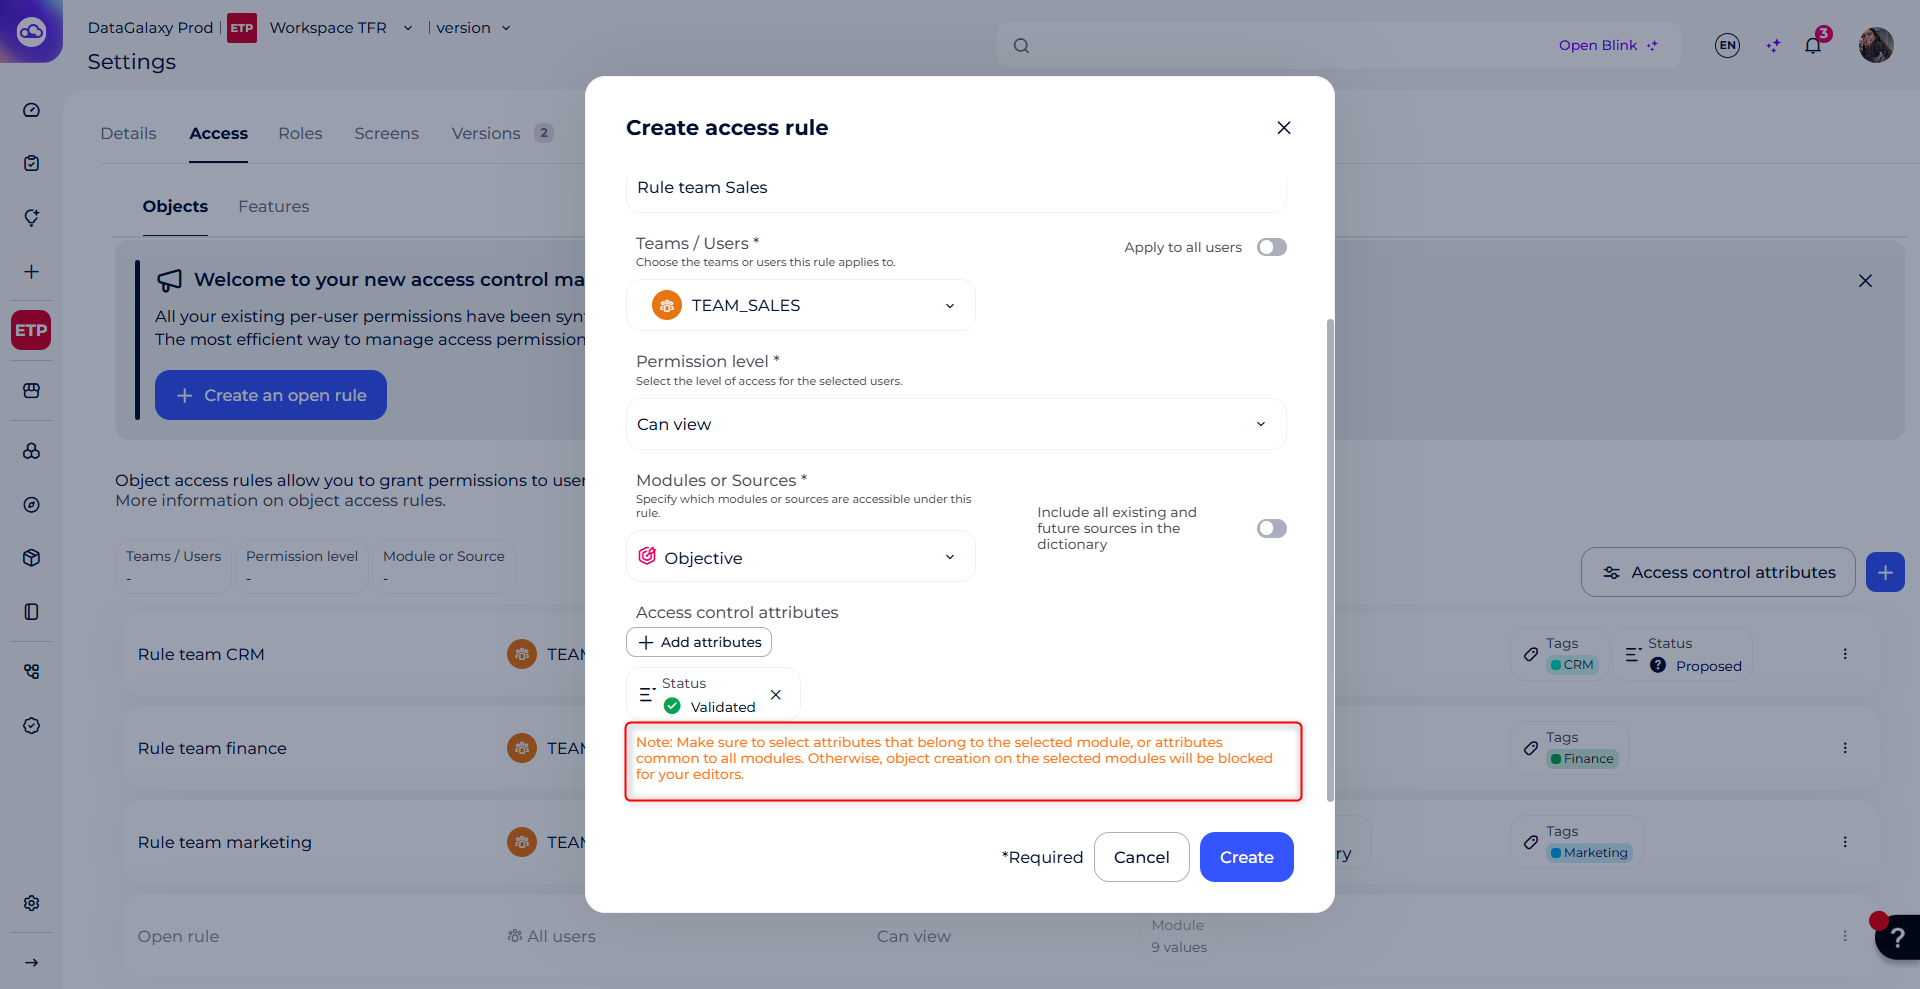
In that case, the attribute won't appear in the object creation window, and your editors may no longer be able to create objects in the affected modules. Make sure to pick attributes linked to the module you selected, or attributes that are common to all modules.
How Access Rules Work
Rule Priority and Combination
An access rule can be "edit" (edit rights) or "view" (read-only). If two rules apply to the same user on overlapping scopes, the "edit" rule always wins over the "view" rule.
Within a single rule, filters combine like this:
- Between different attributes (module, tag, status...), it's an AND: all conditions must be true. For example, a rule on module Glossary AND tag "CRM" AND status "Proposed" only covers objects that meet all three at once.
- Between values of the same attribute, it's an OR: just one needs to match. For example, a rule with tag "CRM" OR "Hubspot" covers all objects with either tag.
Rules Apply Object by Object
Each rule applies to each object on its own: for a user to have access to an object, that specific object has to meet the rule's conditions (module, tag, status, etc.).
Parent-child links aren't taken into account automatically. So if a parent object meets the rule's conditions, that doesn't automatically give access to all its children. Same the other way around: if a child object meets the conditions, that doesn't automatically give access to its parents.
This means you can run into a fairly common situation: a user has access to the parent but not to some of its children. For example, if a child object is marked confidential, it stays invisible to that user everywhere on the platform (hierarchy view, search, diagrams...).
There's also a rarer, opposite case: a parent object that's not accessible, with accessible children.
Access to Sources and Their Child Objects
When a rule gives access to a source with no other filter, the source and all its children (at every level) become accessible.
If you add a specific tag or status to the rule on top of the source, only objects under that source (including the source itself) AND carrying that tag/status become accessible. An object with the tag/status but outside the targeted source won't be covered — the tag/status alone isn't enough, the object also needs to be under the source set in the rule. If a child object is moved out of its original source, it loses the access granted by the rule, even if it still has the tag/status.
Creating and Importing Objects
The object creation window has been updated with a new section for access rights attributes. The goal is to stop users from creating an object that would become inaccessible to them right after creation.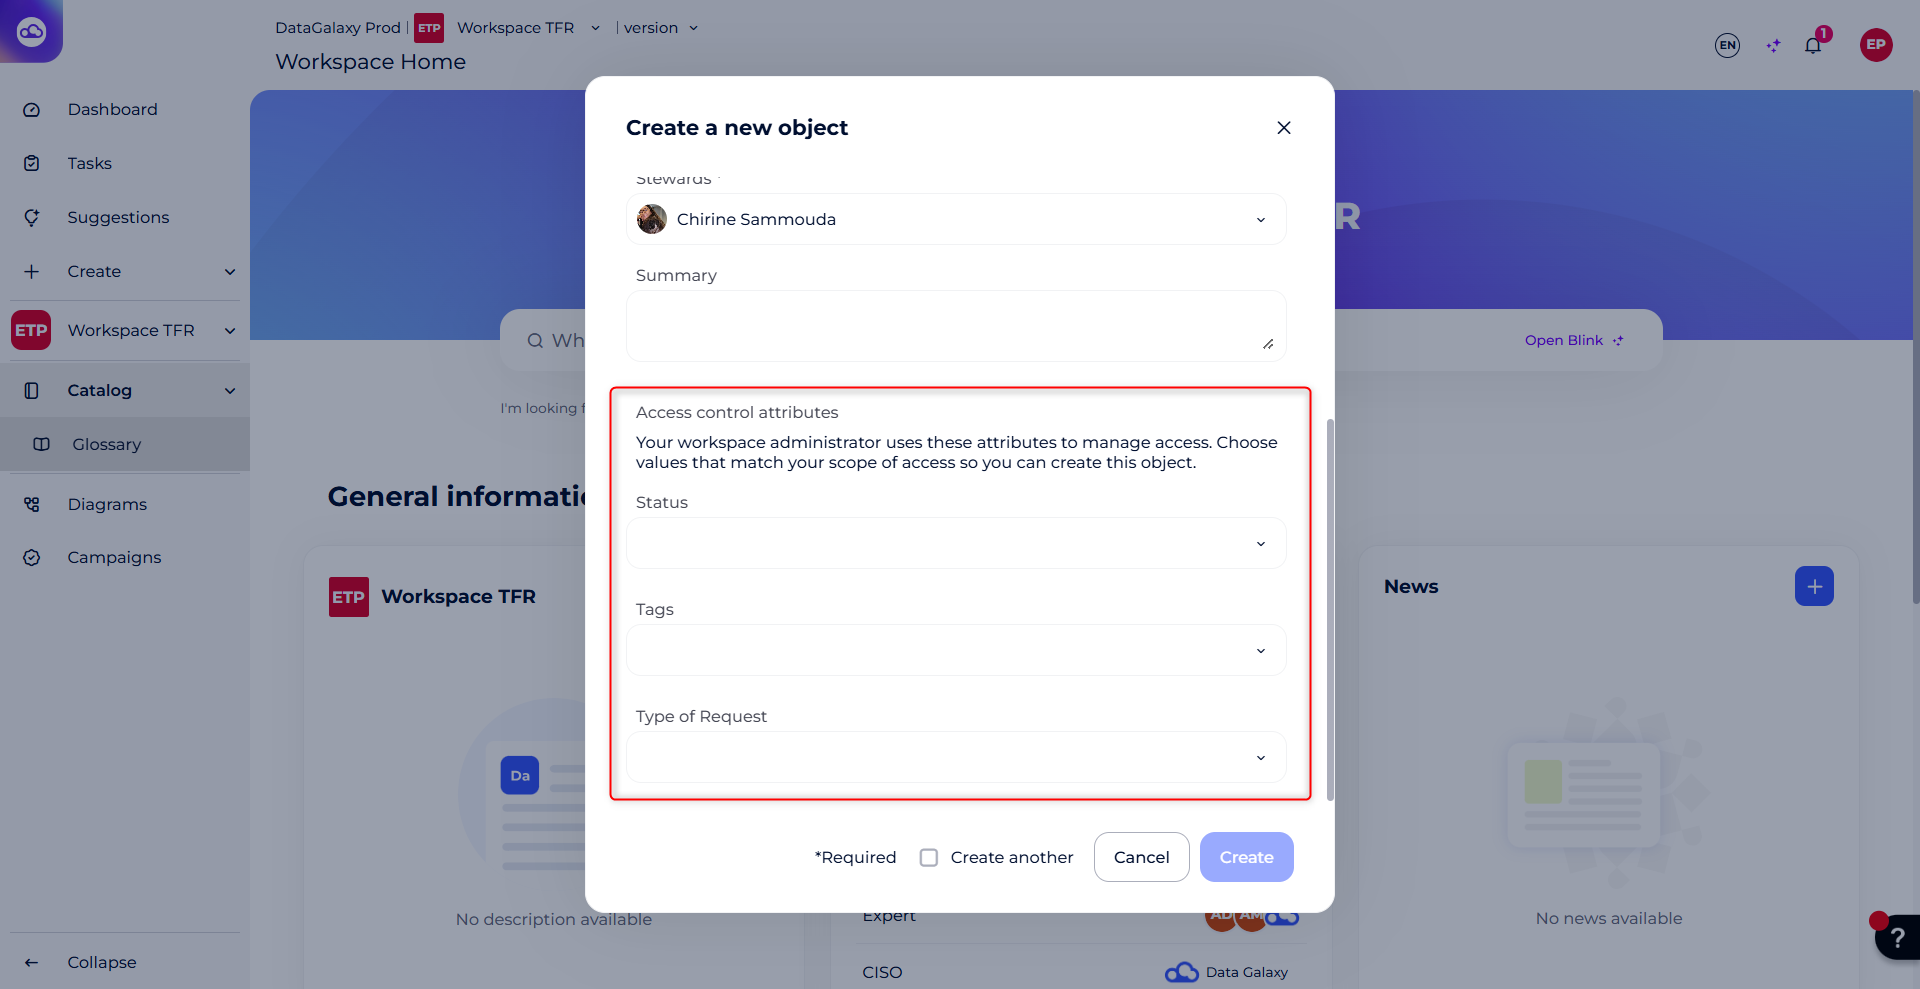
As shown in the screenshot above, a new "Access Control Attributes" section now appears in the window, with this message: "Your workspace administrator uses these attributes to manage access. Choose values that match your scope of access so you can create this object."
This section shows the fields that match the access control attributes set up by the workspace admin (here, "Status" and "Tags").
These fields are mandatory: users need to fill them in with values that match their access scope in order to create the object. Until they're filled in correctly, creation stays blocked — this way, the object stays accessible to the person who created it.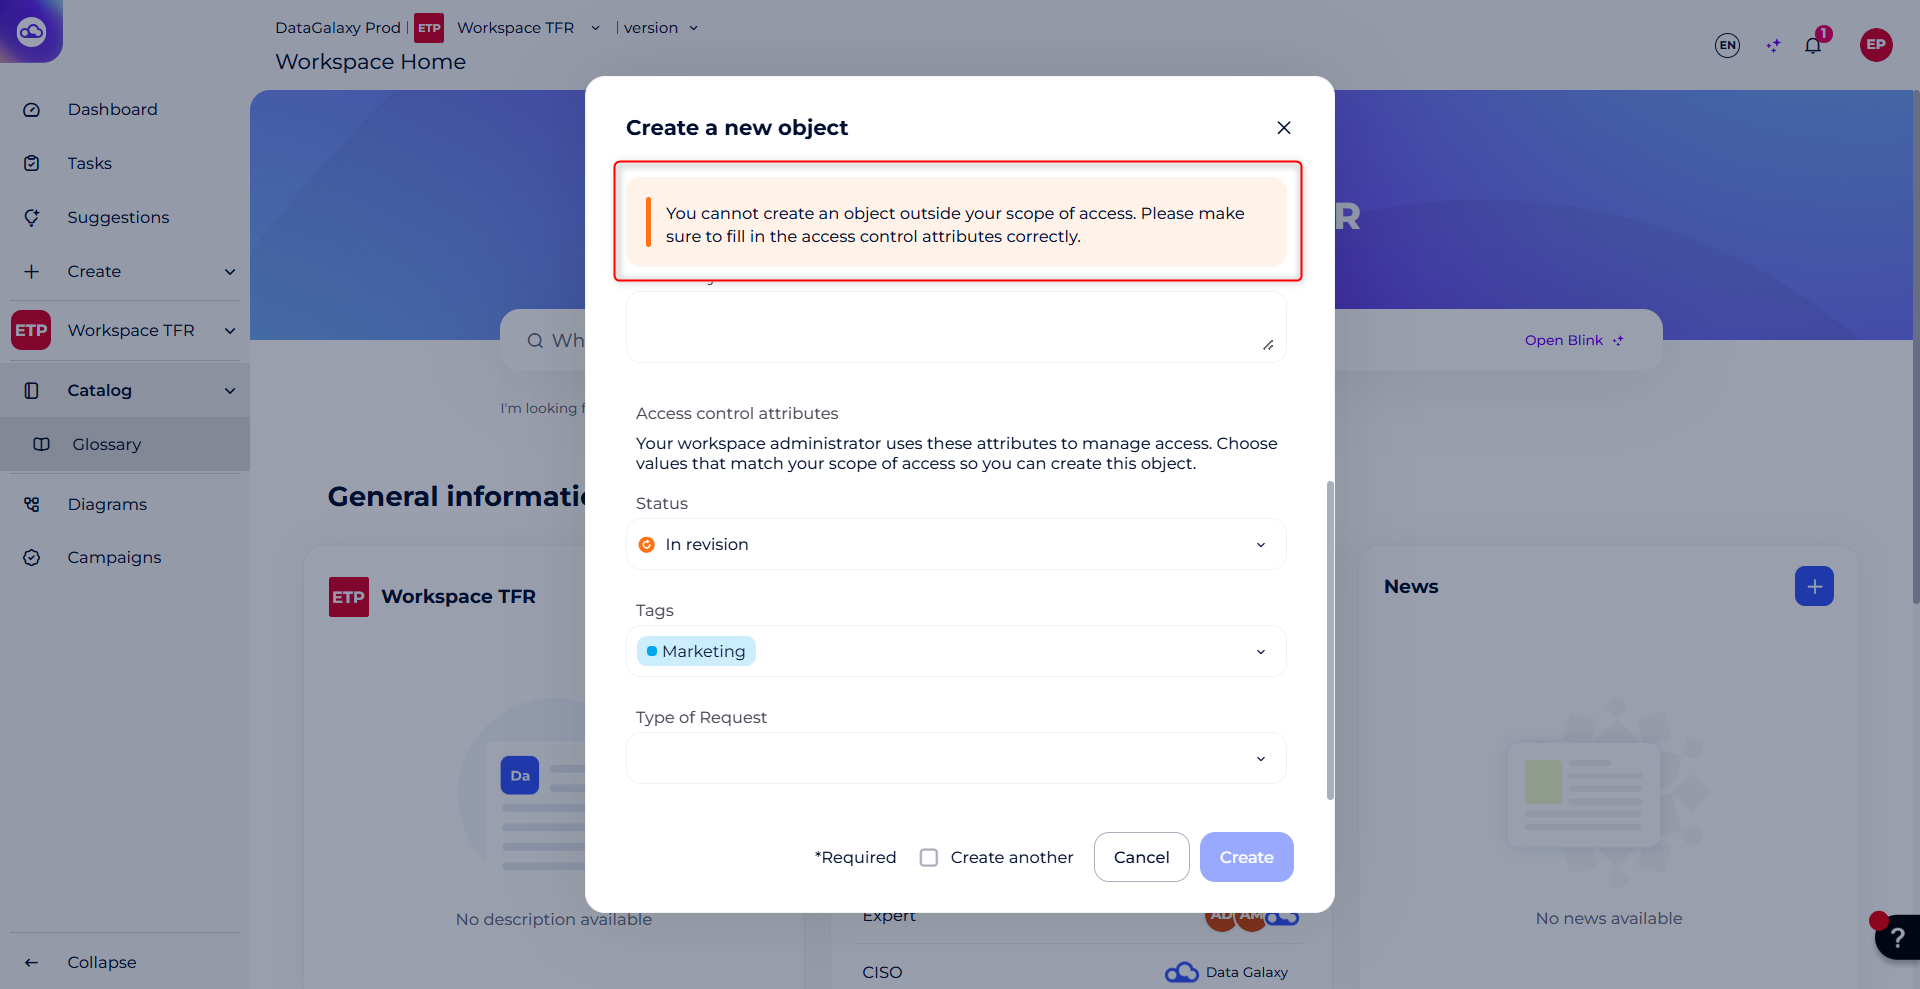
In the screenshot above, the user is on the CRM team, with an edit rule on the Glossary limited to objects with status "Proposed" and tag "CRM". To create the object, they need to fill in status Proposed and tag CRM to match their access scope. Until they do, the Create button stays greyed out and creation is blocked.
This doesn't work the same way for imports though: importing objects outside your scope isn't blocked, but the imported objects will become inaccessible to you once the import is done. If this happens to you, reach out to your workspace admin.
Exporting Objects
Export is available to everyone, editors and viewers alike — you just need access to a module or object to export it. The export only includes objects you actually have access to.
For the Dictionary module, full export is still admin-only. A user with partial access (viewer on some sources only) can only export the sources they have access to.